Screed Removal

Vinyl Covered Victorian Hallway Floor Restoration Warwick

Victorian Hallway restoration in Warwick

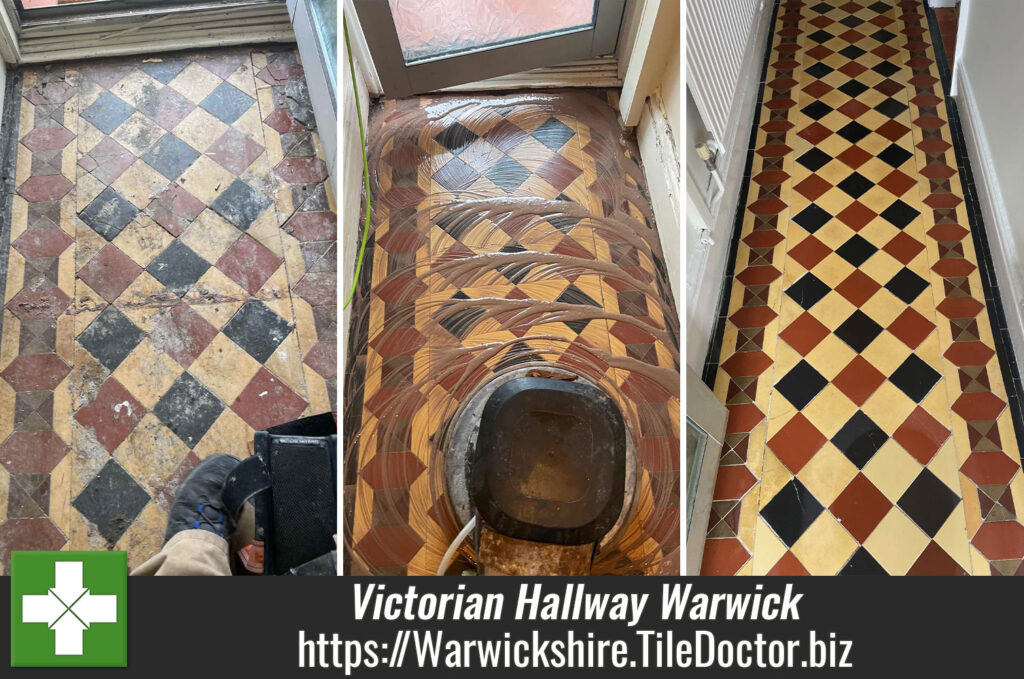
I took these photographs of an original Victorian tiled floor at a 1900’s house in Warwick, near the racecourse. The floor had been covered in vinyl for many years and had decided to replace it. However, after realising the value a restored period floor can add to a property, they investigated having it restored and consequently contacted Tile Doctor.

Vinyl Covered Victorian Floor Before Restoration Warwick Vinyl Covered Victorian Floor Before Restoration Warwick

Before quoting I went over to the house to survey the floor and work out what would be needed to renovate it. I could see that the main issues would be the self-levelling screed and adhesive that had been used to secure the vinyl. There were also numerous tiles that would need replacing. None of this concerned me though as I have worked through these sorts of issues many times before.

Vinyl Covered Victorian Floor Before Restoration Warwick

I reassured the client that the original floor could absolutely be restored back to its original condition and worked out a price for the work which would take two days, one to clean/repair, and one to seal. My quote was accepted, and a date was arranged for my return.

Cleaning and Repairing a Victorian Tiled Hallway Floor

Old floors like this one don’t have a damp proof membrane under the tiles so I was immediately concerned about increasing the moisture levels in the floor itself, especially as it was previously covered in vinyl which can prevent moisture rising through the floor. As a result, I decided to use as little water as possible when cleaning the floor by using low moisture gel cleaning products.

To remove the screed and adhesive I applied Tile Doctor Acid Gel to the floor and then left it to soak in for ten minutes before working it in with a 100 and then 200-grit abrasive pad. The acidic nature of the gel is really good at breaking down cement and mineral based contaminates allowing them to be removed more easily. After each pad I used a little water to help sluice away the soiled gel and extracted with a wet vacuum.

Vinyl Covered Victorian Floor During Restoration Warwick Vinyl Covered Victorian Floor During Restoration Warwick

After cleaning I then turned my attention to the 23 or so tiles that were either loose or in a bad condition and needed changing. These were carefully removed, and the foundation cleaned up before being replaced with a matching tile that I had managed to source earlier. The replacements were secured with fresh adhesive and then grouted. The floor was then given a quick clean and then left to dry out fully overnight.

Sealing a Victorian Tiled Hallway Floor

The next day I returned and sealed the floor with Tile Doctor Colour Grow which leaves a matt finish and contains a colour enhancing formula that really brings out the colours in the tile. Additionally Colour Grow is also fully breathable and will allow moisture to rise unhindered through the floor and evaporate at the surface, a crucial feature when sealing old floors like this one.

Vinyl Covered Victorian Floor After Restoration Warwick Vinyl Covered Victorian Floor After Restoration Warwick

For aftercare I recommended Tile Doctor Neutral Tile Cleaner which is an effective tile cleaner that is safe to use on sealed tiled floors.


Professional Restoration of a Victorian Tiled Hallway in Worcestershire

Victorian Hallway restoration in Warwick Read More »

Screed Covered 100-Year-Old Quarry Tiled Floor Restored in Nuneaton

Screed Covered 100-Year-Old Quarry Tiled Floor Restored in Nuneaton

I took the photographs below at an old 1920’s house in Nuneaton where the owner was interested in restoring the original Quarry tiled floor in their Kitchen. Interestingly Nuneaton has a rich manufacturing history that included brick and tile making so it’s entirely possible these tiles were made locally at the Haunchwood Brick and Tile company.

Tastes change over the years and at some point in the past the Quarry tiles had been covered with a levelling compound so that linoleum could be installed on top. This meant that the first part of the job would be to remove the screed before I could clean up the tiles. On top of that It was clear as well that many of the tiles were damaged and would need replacing.

Quarry Tiled Floor Before Restoration Nuneaton
I worked out a quote which was agreed by the customer and started looking around for matching replacement tiles, fortunately I was able to track some down at Warwick Reclamation who stock thousands of quarry tiles in many of the common period sizes.

Restoring an Original Quarry Tiled Kitchen Floor

On day one I set about carefully removing the screed with a hammer and chisel and also the damaged tiles, so they could be replaced. With the tiles removed we it was clear some parts of the subfloor were cracked and needed to be rebuild with fresh cement.

Quarry Tiled Floor During Restoration Nuneaton Quarry Tiled Floor During Restoration Nuneaton

Once the floor was ready the replacement Quarry tiles were fixed in place and once the adhesive was dry they were grouted in.

To remove the remaining screed and salt damage from the surface of the tiles I used a set of coarse milling pads which are applied with water for lubrication. The process generates a lot of soil, so the floor needs to be rinsed with water and the soil extracted with a wet vacuum after each pad.

The next step was to pre-treat the tiles with Tile Doctor Remove and Go in order to remove old contaminants such as old oils and then treat the floor to a deep clean with Tile Doctor Pro-Clean which was scrubbed in with black scrubbing pad.

Old floors like these don’t have a damp proof membrane so the last step in the restoration process was to counter any inherent salt issues in the floor that might reappear later as white efflorescence salt deposits. This is done by giving the floor an acid rinse using Tile Doctor Grout Clean-up which is scrubbed into the tiles, neutralising the salts, this product also removes old mineral deposits and grout smears.

The floor was given a final rinse with water to remove any traces of products used and then as much water and moisture as possible was extracted using a wet vacuum. The floor was then left to dry out for a few days.

Sealing a Quarry tiled floor

When I returned my first job was to take multiple readings around the floor using a damp meter to verify the floor was dry and ready for sealing. The extra drying time had done the trick and I was able to seal the floor using multiple coats of Tile Doctor Seal and Go Extra which is a fully breathable sealer that can cope with any potential moisture problems, it also leaves a nice sheen finish that brings the best out of Quarry tiles.

Quarry Tiled Floor During Restoration Nuneaton Quarry Tiled Floor During Restoration Nuneaton

In total the restoration took 4 days to complete and had completely restored the Quarry tiled floor close to what they must have looked like back when they were installed nearly a hundred years ago.

Quarry tiles tiled floor restored in Warwickshire

Screed Covered 100-Year-Old Quarry Tiled Floor Restored in Nuneaton Read More »

Scroll to Top