Rugby Tile Cleaning

Rugby Tile Cleaning

Welcome to my Work History archive where you will find examples of the cleaning and renovation of tiles carried out in Rugby.

Edwardian Tiled Diamond Pattern Hallway Floor Restoration Rugby

Classic Black and White Diamond Pattern Encaustic Tiled Hallway Restoration in Rugby

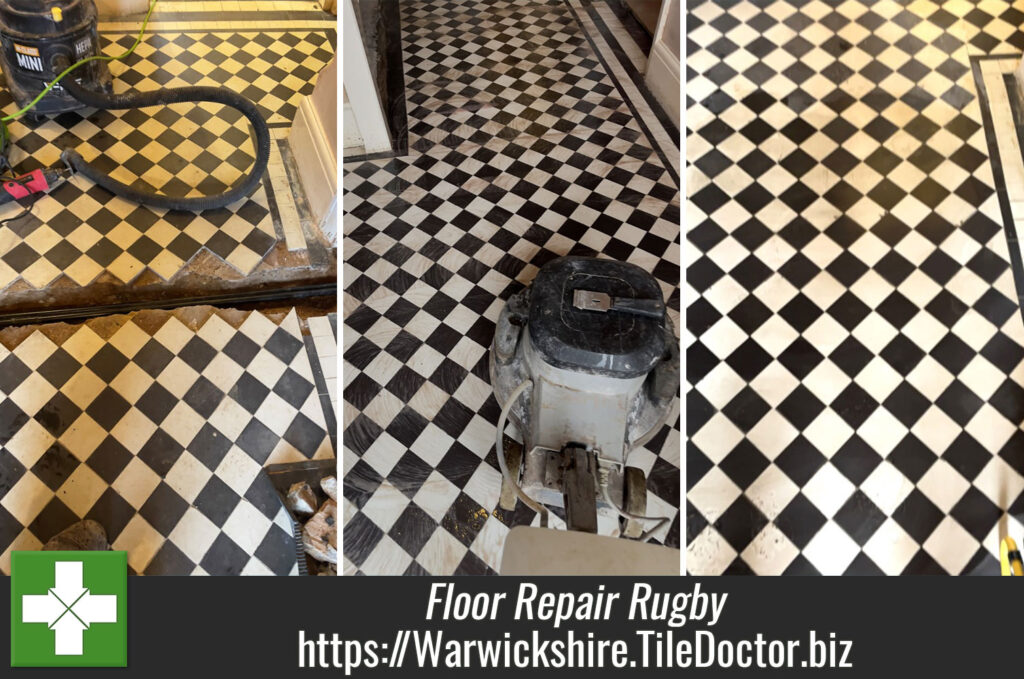
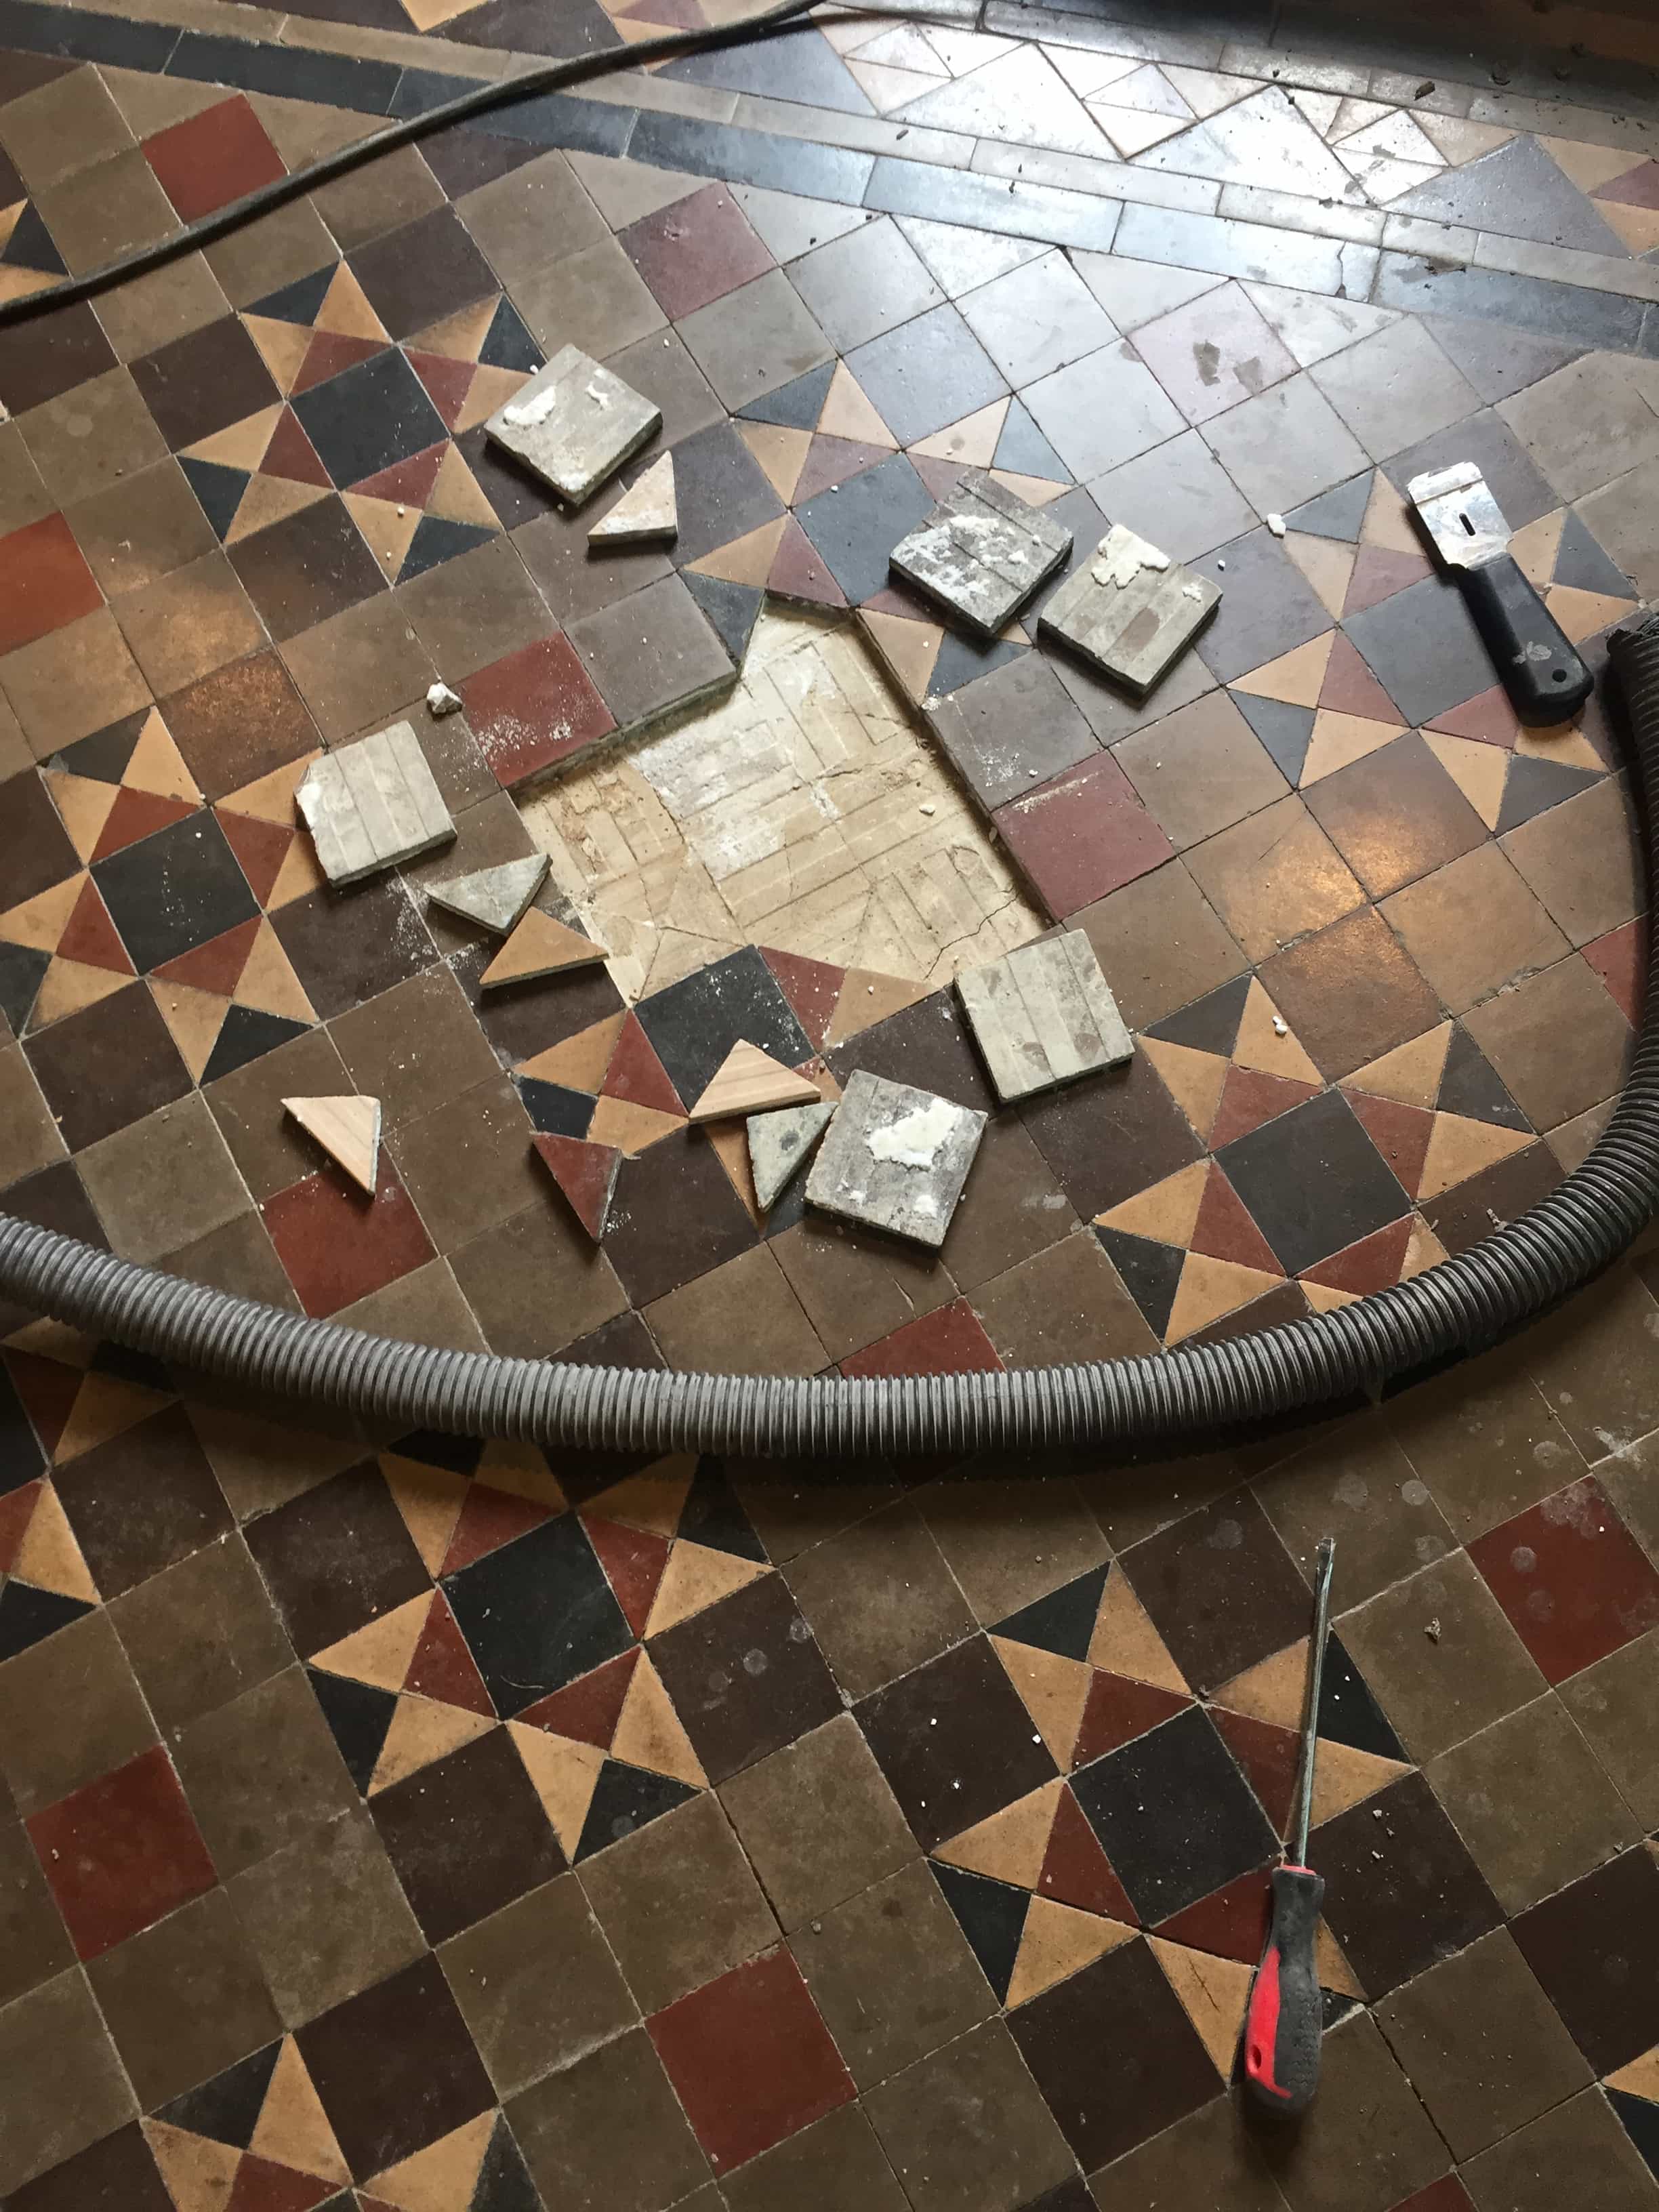
Earlier this year the owner of an Edwardian 1930’s double bay property in Rugby got in touch regarding an original encaustic cement tiled hallway floor that needed renovation. The floor had been covered in carpet with underlay for many years and this had recently been removed by the owner only to discover this classic floor underneath. Realising it was an original period feature they wanted to have it restored.

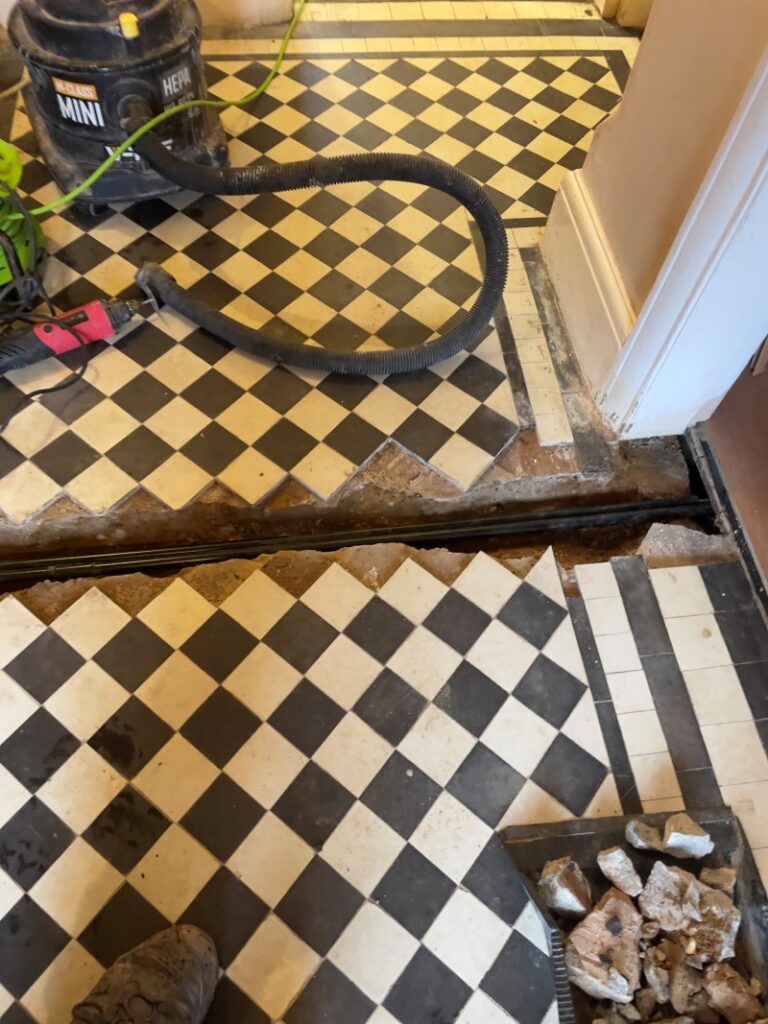
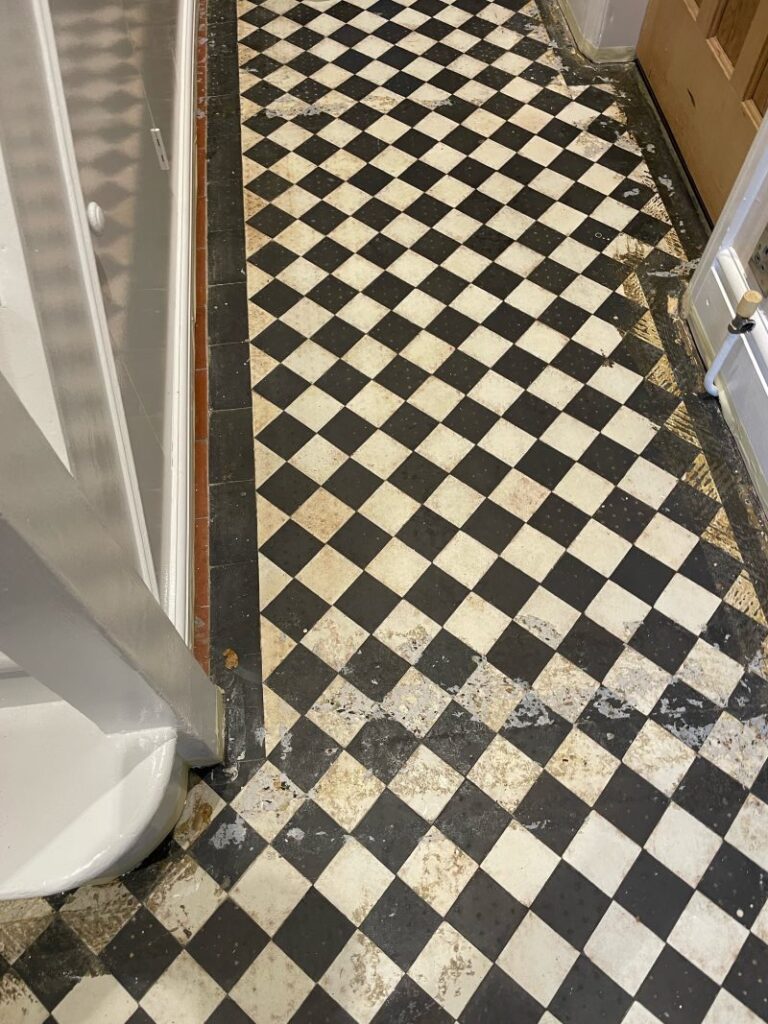
Edwardian Tiled Diamond Pattern Floor Before Restoration Rugby

I paid a visit to the property to survey the floor and work out a process for its restoration. It comprised of encaustic tiles (more commonly referred to as Victorian) laid in a diamond pattern throughout the main hallway.

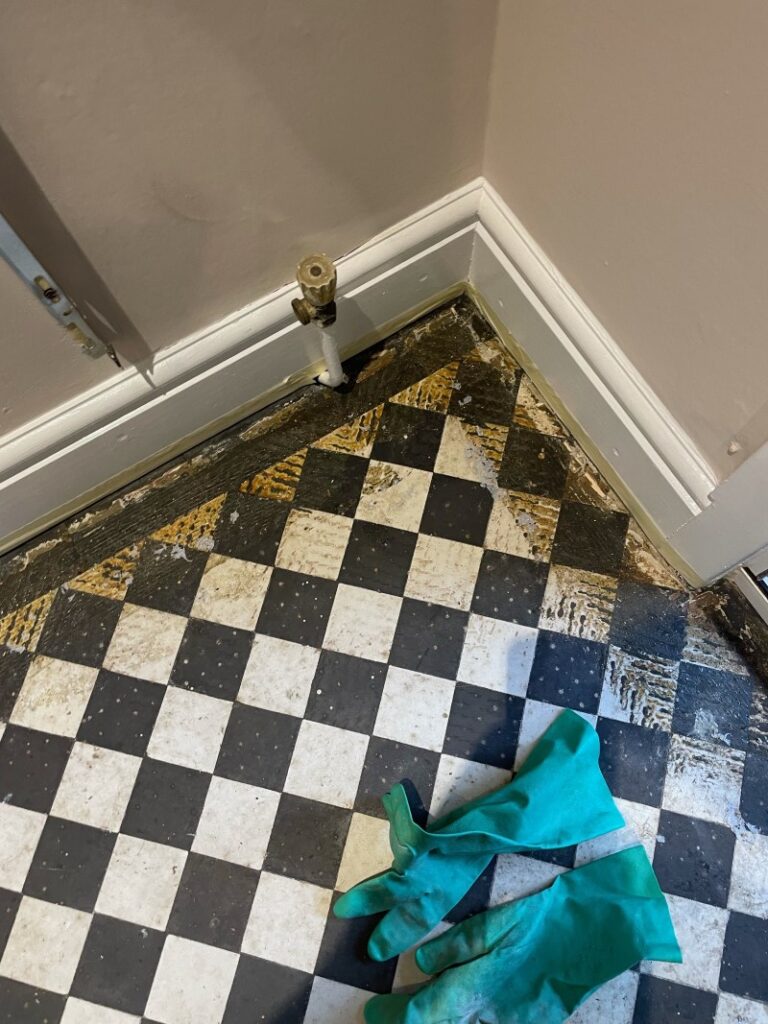
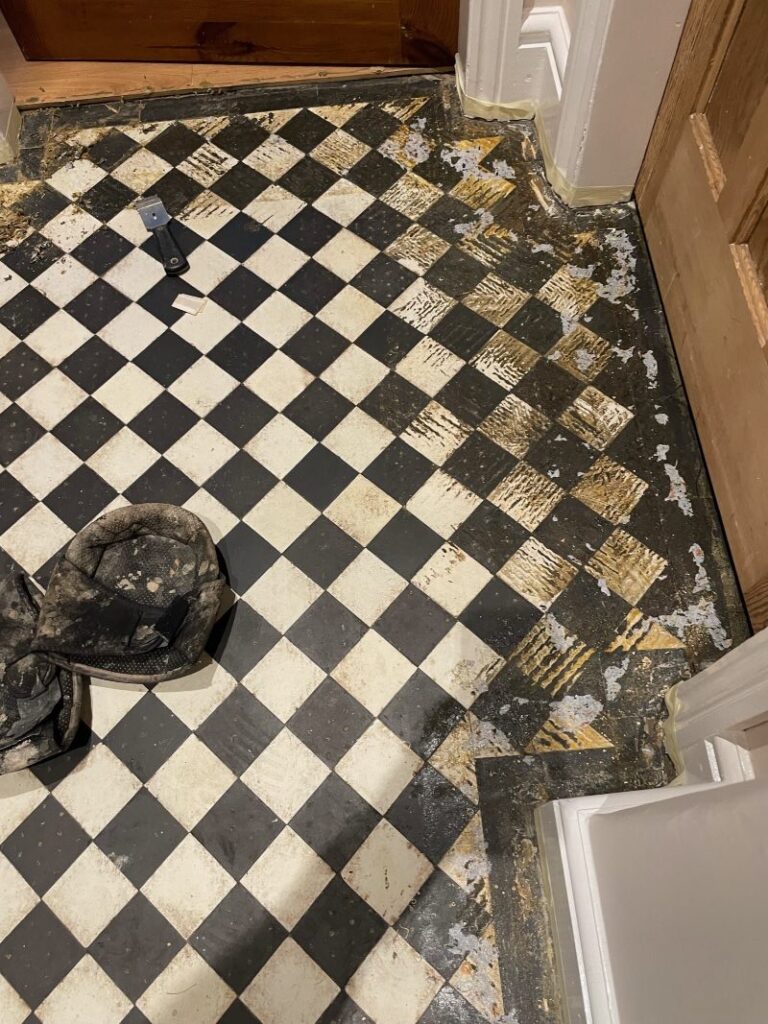
Having inspected the floor I was able to confirm no tile repairs would be needed, and the main issue would be removing the thick layer of glue which was predominantly used around the perimeter of the floor to secure the carpet.

Edwardian Tiled Diamond Pattern Floor Before Restoration Rugby Edwardian Tiled Diamond Pattern Floor Before Restoration Rugby

Once that had been dealt with, the tiles would need deep cleaning to remove years of dirt and then sealing to add protection going forward. I worked out a quote based on the restoration plan and was confident the work could be completed in a day. Happy with the quote, a date for the work was scheduled.

Cleaning an Edwardian Encaustic Tiled Hallway

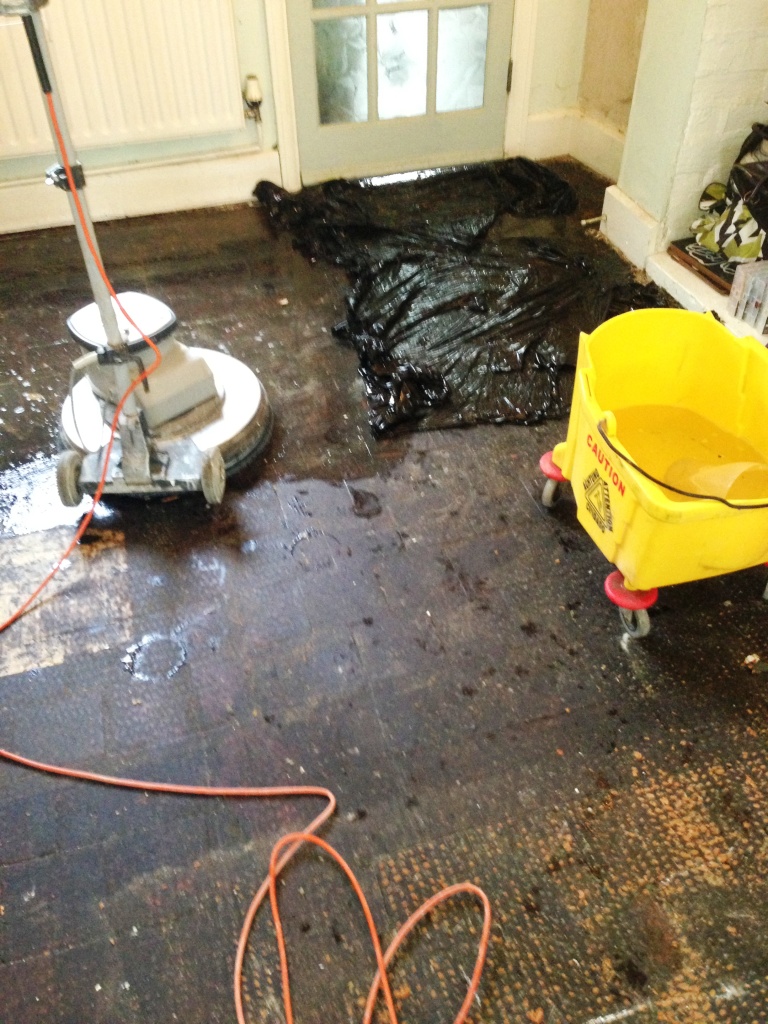
The first job was to tackle the glue which involved applying neat Tile Doctor Remove and Go and then leaving it for ten minutes for it to soak in and break down the adhesive. Handheld scrapers where then used to carefully scrape off the glue and then this was followed up with hand-held diamond blocks of different grits to ensure all the adhesive was removed. The soiling was then extracted using a wet vacuum.

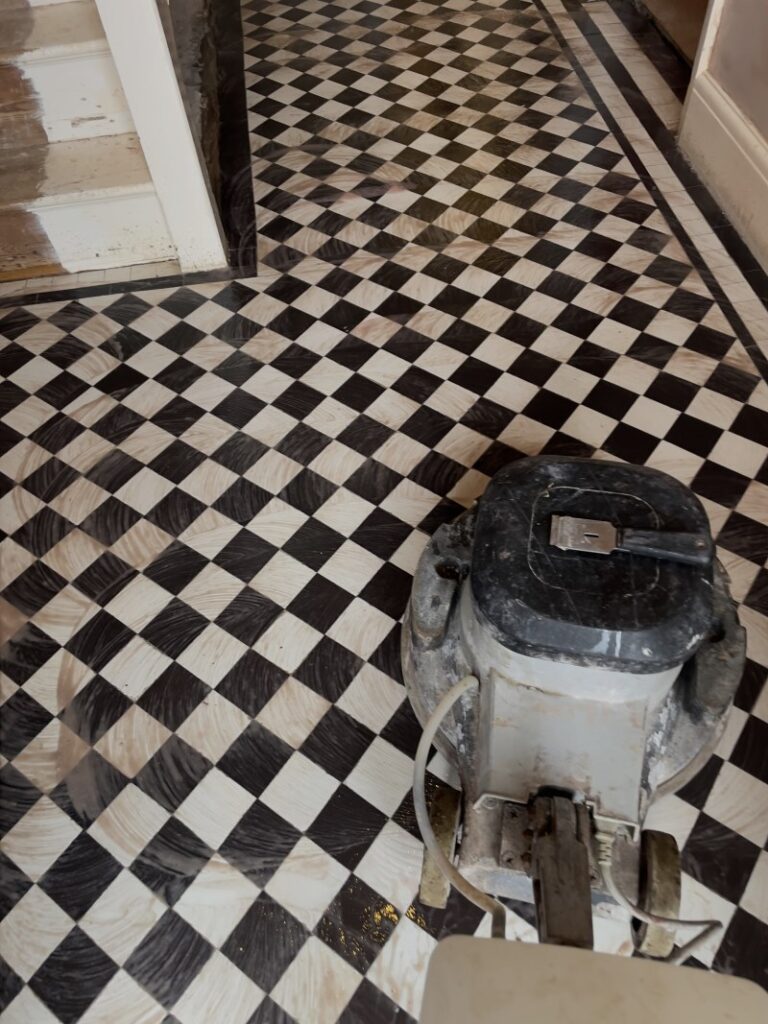
The whole floor was then cleaned using an application of Tile Doctor Oxy-Gel, again left to soak in and then scrubbed this time with a buffer machine fitted with a black scrubbing pad.
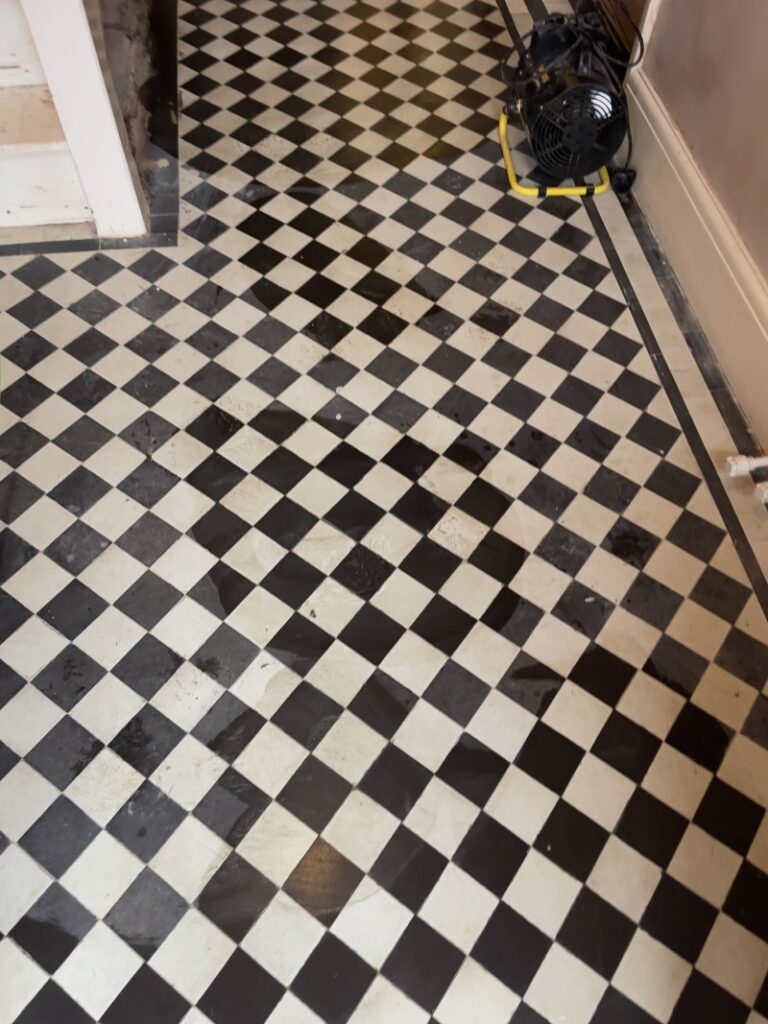
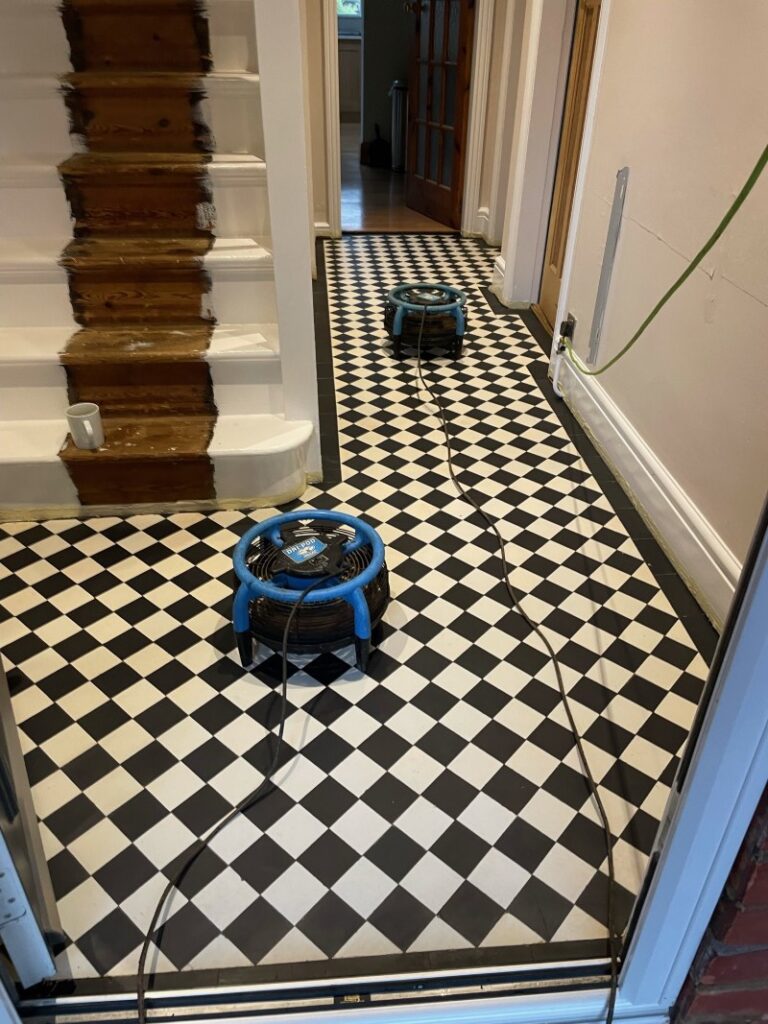
The soiling was then removed with a wet vacuum and then wiped with cloths to get it as dry as possible. I also deployed a couple of floor fans to further dry the floor.

Edwardian Tiled Diamond Pattern Floor During Drying Rugby

Using a Gel cleaning product minimised the amount of water used to clean the floor and thus result in a reduction in drying times. I also deployed a couple of floor fans to assist with drying which were moved around the floor. It could need to be completely dry before sealing however so it was left for a few hours before being checked for moisture with a damp meter.

Sealing an Edwardian Encaustic Tiled Hallway

To seal the tiles, I applied a couple of coats of Tile Doctor Colour Grow, leaving a good thirty minutes between coats. This sealer is fully breathable and will cope well with any moisture that rises through the tile from the foundation and allow it to evaporate. Old floors like this one were installed before the invention of damp proof membranes and so need to be allowed to breathe.

Tile Doctor Colour Grow is a colour enhancing impregnator which works by occupying the pores in the tile and thereby preventing any dirt from residing there. This keeps dirt on the surface where it can be easily cleaned away.

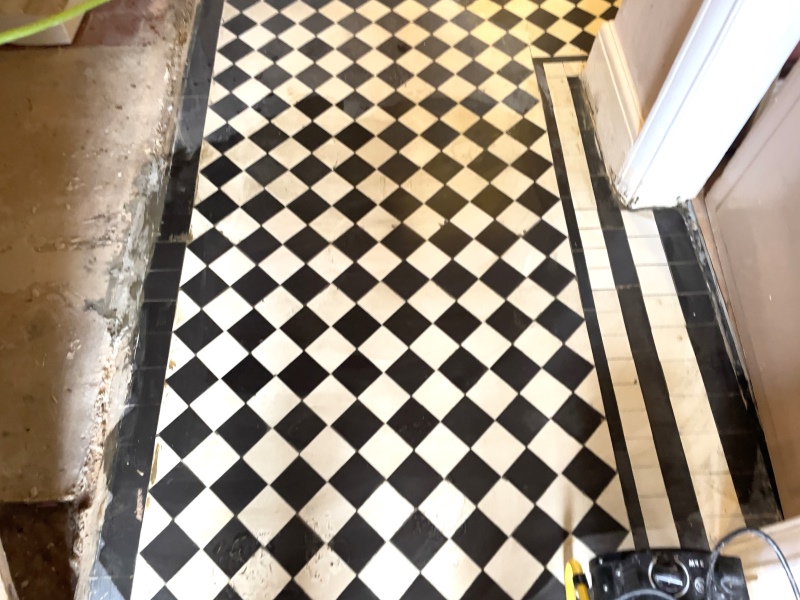
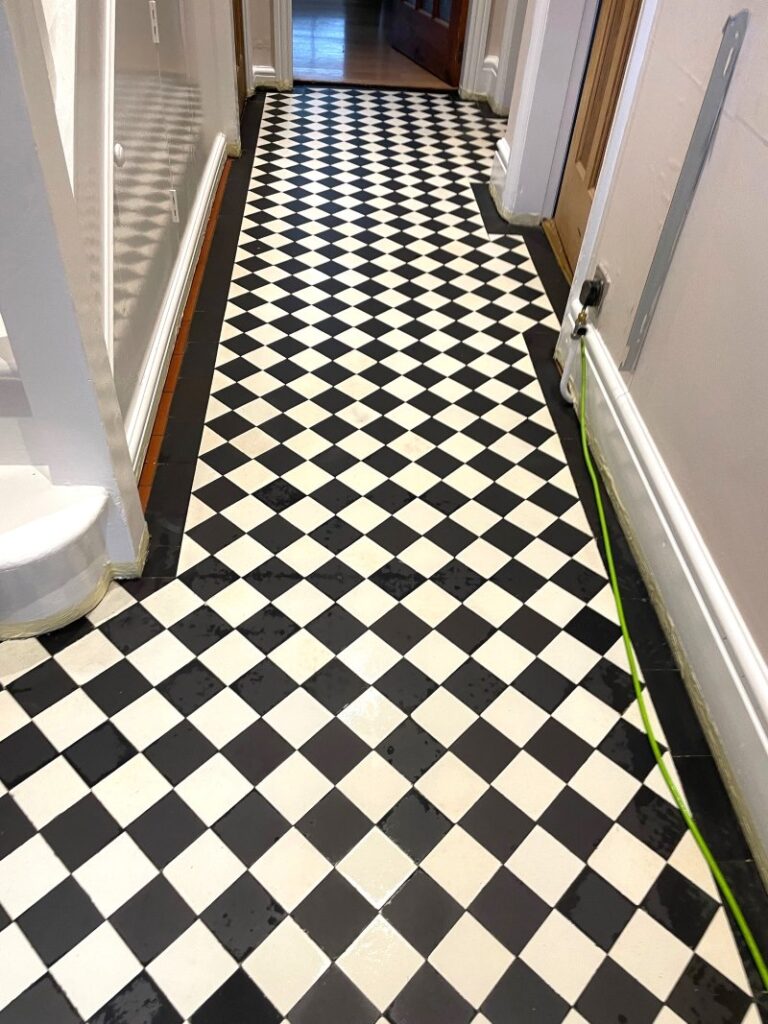
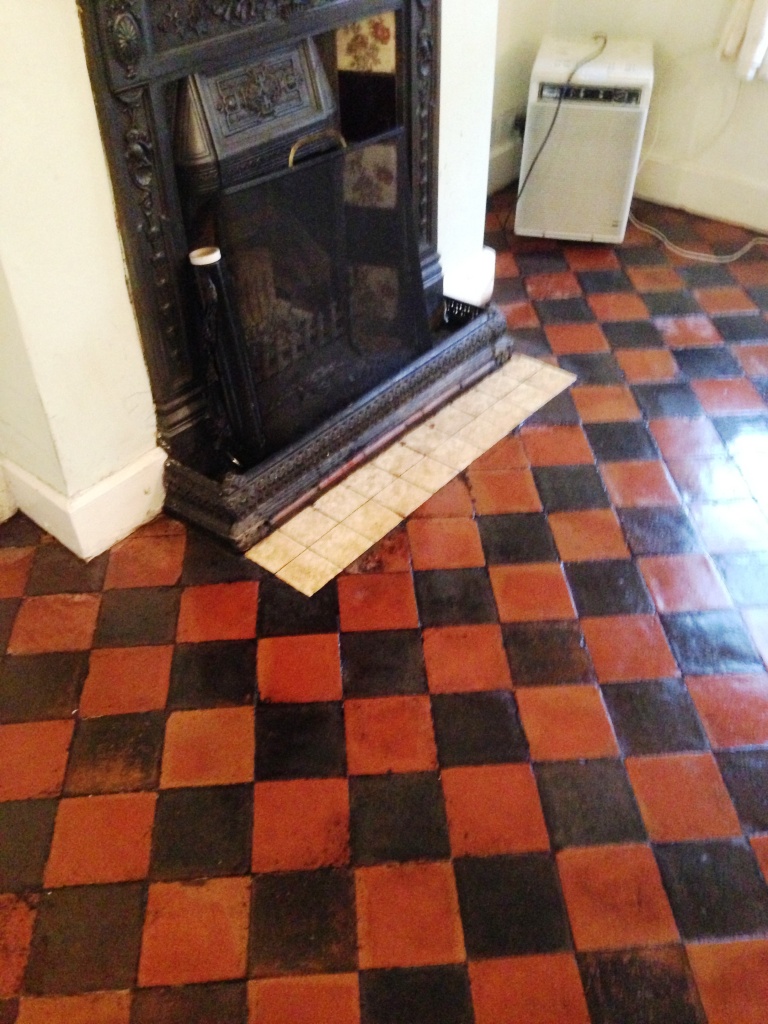
Edwardian Tiled Diamond Pattern Floor After Restoration Rugby

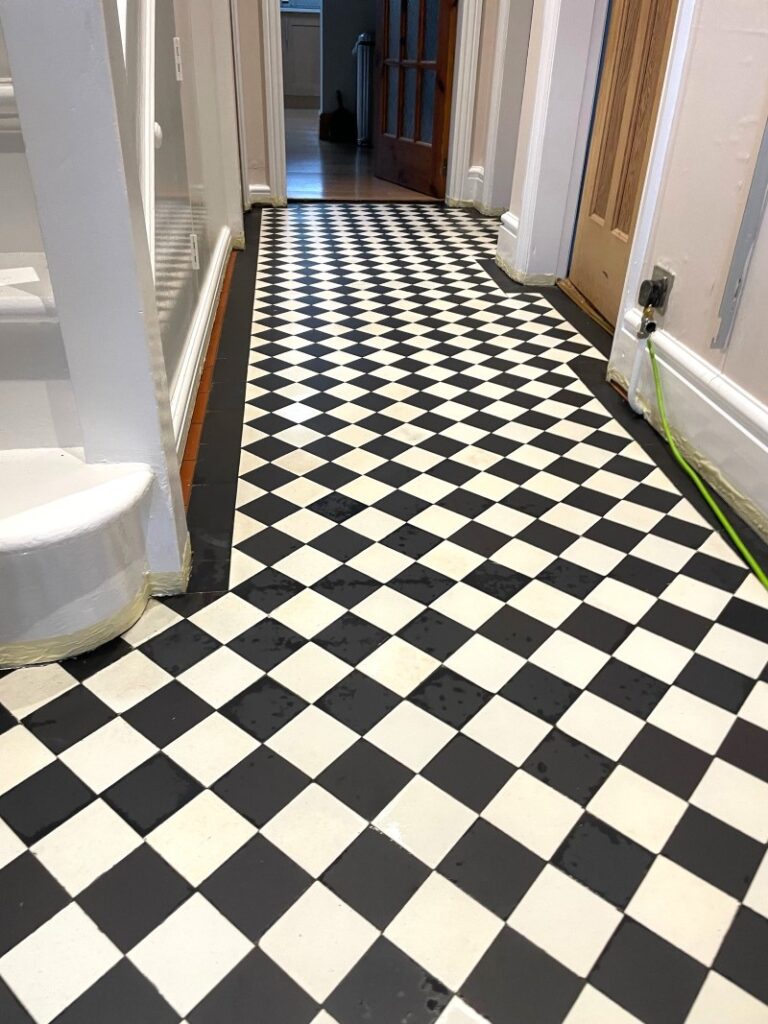
The colour enhancer in the new sealer really made the Black tiles pop and should remain that way as long as the sealer stays in place. Regarding cleaning, I recommended they use Tile Doctor Neutral Tile Cleaner. This product is pH neutral and so won’t impact the sealer which can be the problem with many of the stronger products you find in supermarkets.

My clients were very happy with the renovation, and I popped back a week later to check everything was fine.

Edwardian Tiled Diamond Pattern Floor After Restoration Rugby


Professional Restoration of a Edwardian Encaustic Tiled Hallway in Warwickshire

Classic Black and White Diamond Pattern Encaustic Tiled Hallway Restoration in Rugby Read More »

Quarry Tiled Kitchen Floor Tiles Before After Renovation Rugby

Quarry Tiled Floor Layout Altered and Renovated in Rugby

This customer in Rugby had some major internal work done on their property to increase the size of the kitchen. Effectively they had combined two areas together, but this had left gaps in the floor tiling where the walls had once been. Although I had discussed the floor in detail over the phone, I visited the property so I could survey the floor and give the owners an accurate quote for the remedial work.

Quarry Tiled Kitchen Floor Before Renovation in Rubgy Quarry Tiled Kitchen Floor Before Renovation in Rubgy

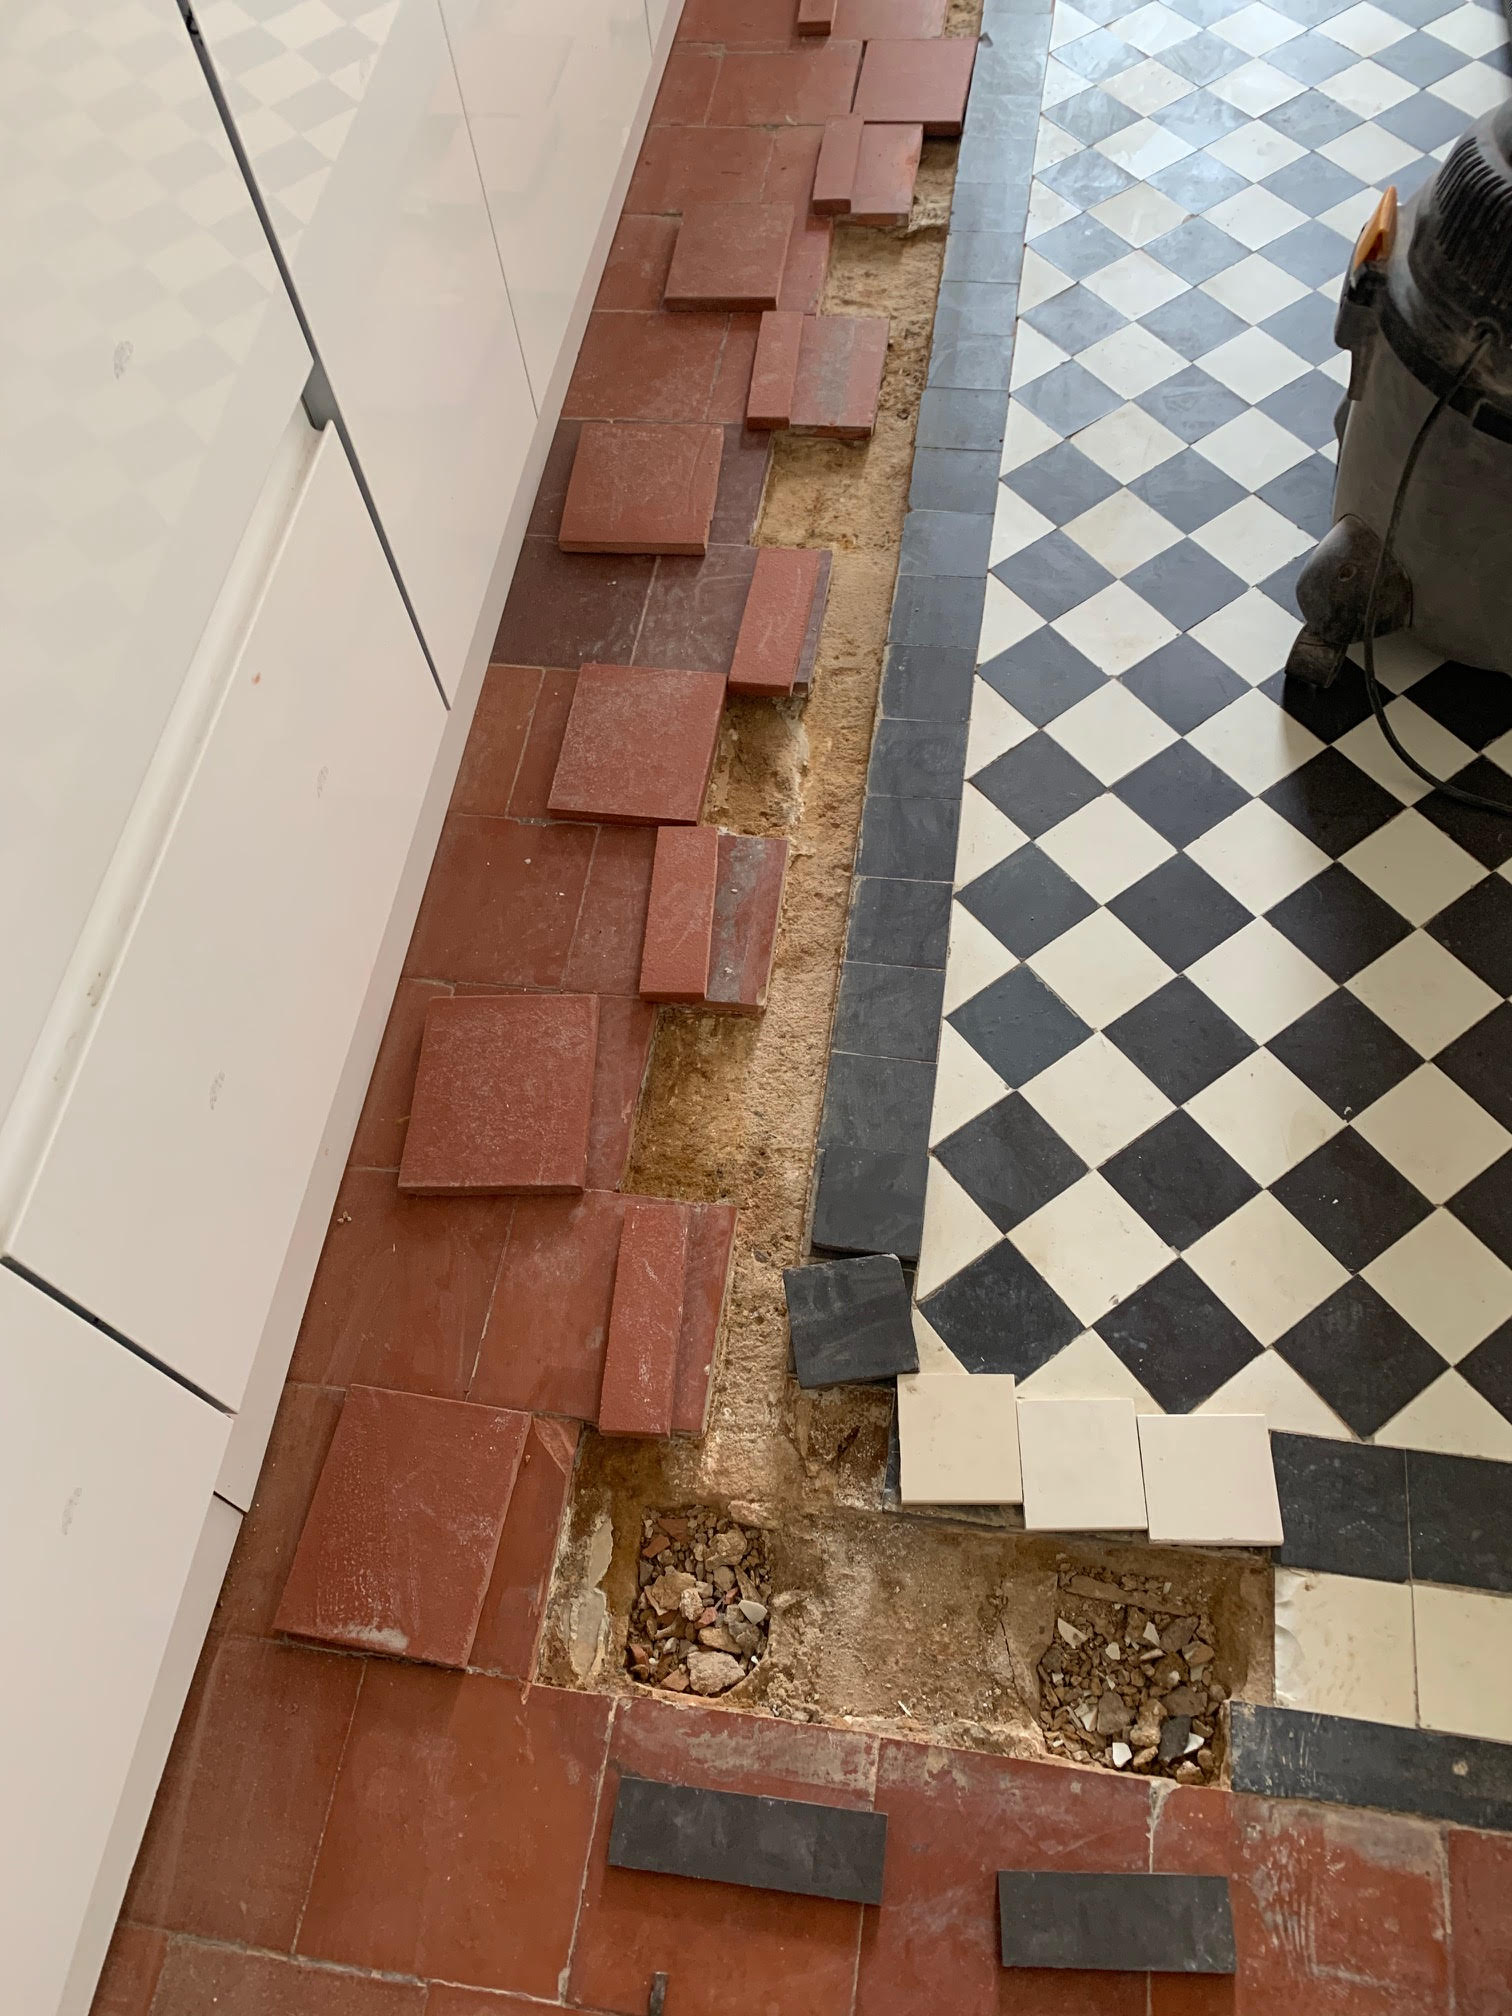
If you look closely at the image above, you will see where the under-stair cupboards and support posts have been removed. The changes meant sections of untiled floor were now visible and needed new matching quarry tiles added to fill the gaps including large deep holes where the support post had once been.

Quarry Tiled Kitchen Floor Before Renovation in Rubgy

After inspecting the floor, I prepared a comprehensive quote that included cutting and fixing replacement Quarry tiles and giving the whole floor a deep clean and seal so the new would blend in with the old. My quote was much a much cheaper option compared with ripping out the whole floor and replacing with new. Also, I was confident I could find a good match for the Quarry tiles among my collection of reclaimed tiles I had available. Being a Tile Doctor I focus a lot on restoration and have accumulated quite a collection of old tiles as you never know when they might come in handy.

After weighing up the options the customer confirmed they would like to go ahead with the work, so we agreed a date for my return.

Fitting Matching Quarry Tiles to a Kitchen Floor

The first job was to hand cut matching quarry tiles to fit, clean out the holes in the floor and prepare a new level base within with cement. I had to wait for the new base to harden so I wasn’t able to fit the tiles until the next day however I was able to use a quick setting tile adhesive for that so I was able to grout them in later that day once the adhesive had gone off.

Quarry Tiled Kitchen Floor During Renovation in Rubgy Quarry Tiled Kitchen Floor During Renovation in Rubgy

As well as the Quarry tiles there was a section beneath a door threshold that needed fixing with matching replacements. I left the adhesive and grout to fully harden overnight leaving behind yellow cones to mark the affected tiles so the owner would know where not to walk.

Deep Cleaning a Quarry Tiled Kitchen Floor

On day three with the tiling work completed I was able to move onto deep cleaning the floor. For this I used Tile Doctor Oxy-Gel which I prefer when working in smaller areas as being in gel form it is much easier to control. The gel is applied with a little water to help dilute it and then left to soak in for ten minutes. The floor is then scrubbed with a black scrubbing pad fitted to a buffing machine and the soil extracted with a wet vacuum.

Next, I treated the tiles to an acid wash using an application of Tile Doctor Acid Gel, again this is in gel form and is left on the tiles for ten minutes before being scrubbed in with a pad. This product further cleans the tiles by removing grout smears, hazing and other mineral deposits. Afterwards the floor was rinsed with water and the resultant slurry extracted with a wet vacuum to remove any trace of cleaning products.

Quarry Tiled Kitchen Floor During Renovation in Rubgy

Before leaving for the day, the floor was inspected, and any stubborn marks spot cleaned until I was happy the floor was as clean as it possibly could be. I was pleased to see that the newly laid tiles were already blending in nicely.

Sealing a Quarry Tiled Kitchen Floor

It’s not a good idea to apply a sealer to damp tiles as the result can be inconsistent so I agreed with my customer to come back five days later to seal them. On my return I checked the moisture levels with a damp meter to be certain the Quarry tiles were dry before applying an initial application of Tile Doctor Stone Oil. Stone Oil seeps into the pores of the Quarry tiles adding protection and restoring colour and texture.

Once dry I followed up with a couple of coats of Tile Doctor Colour Grow which like the Stone Oil impregnates deep into the pores of the tile to prevent dirt becoming ingrained there. This sealer also enhances colour and combined with the Stone Oil will provide long lasting durable protection to the floor. Kitchens generally tend to be high traffic areas with people coming and going all the time so it’s important the tiles are protected.

Quarry Tiled Kitchen Floor After Renovation in Rubgy

Once complete the floor looked great, as promised the new tiles blended in well with the original, and most importantly my client over the moon as the renovated floor had added the finishing touch to the newly fitted kitchen.

Quarry Tiled Kitchen Floor After Renovation in Rubgy Quarry Tiled Kitchen Floor After Renovation in Rubgy


Professional Renovation of a Quarry Tiled Kitchen in Warwickshire

Quarry Tiled Floor Layout Altered and Renovated in Rugby Read More »

Victorian Tiled Church Floor Renovation Rugby

Repairing and Restoring Victorian Tiles ad St Chad’s Church in Rugby

I was called out to repair and clean a lovely Victorian tiled floor at St’ Chads which is a small church in Rugby, a market town in Warwickshire and well known for being the birthplace of Rugby Football. There were two areas requiring attention, both with different patterned tiles.

St Chads Church Rugby Internal

The floor had been patch repaired in the past and the tiles were now lifting and becoming loose due to efflorescent salts getting between the tiles. Damp can be a big problem with these old floors where no damp proof membrane has been fitted and I suspect a non-breathable sealer had been used previously, resulting in moisture being trapped under the tile.

Victorian Church Floor Rugby Before Repair

It’s lovely when I get to work in a property such as this, it makes a change from doing residential properties. I was confident I would be able to resolve the problems, and I was given the keys and time just to get on with it.

St Chads Church Rugby External

Cleaning and Repairing a Victorian Tiled Church Floor

I’m always on the lookout for reclaimed tiles on eBay so I was luckily able to repair the floor using some tiles from my collection which matched the existing and also some of the new ones that were fitted after the floor was repaired. Once the tile adhesive had set the tiles were grouted in using a matching grout. I managed to make the repairs in the morning and moved onto cleaning the floor in the afternoon once I was sure the adhesive and grout had set.

Victorian Church Floor Rugby During Repair

Concerned about adding moisture to the floor I opted to scrub the tiles with Tile Doctor Acid Gel which being an acid would counter any alkaline salts inherent in the floor and also deal with grout smears as well. After scrubbing the tiles with the Tile Doctor Acid Gel the soiled product was extracted using an industrial wet vacuum and then the floor was given a quick rinse with water which again was extracted using the wet vacuum.

To ensure there was no increase in the level of dampness in the floor I took moisture readings before and after the cleaning process. I then left the floor to dry out for a few days.

Victorian Church Floor Rugby After Repair

Sealing a Victorian Tiled Church Floor

When I returned I first checked the tiles were dry using the damp meter and verified that they had returned to the baseline level I took at the start. With all being well I applied several coats of sealer to the floor. Given the issue with the tiles lifting previously I was keen not to repeat the previous issue and used Tile Doctor Seal and Go Extra which is a fully breathable sealer ideal for floors where damp can be a problem. This gave the tiles a nice natural sheen and allowed the colours to shine through.

Victorian Church Floor After Restoration Victorian Church Floor Rugby After Restoration

The parishioners were very happy with the repairs to the floor and to see their lovely church restored.


Professional Restoration of a Victorian Tiled Church Floor in Warwickshire

Repairing and Restoring Victorian Tiles ad St Chad’s Church in Rugby Read More »

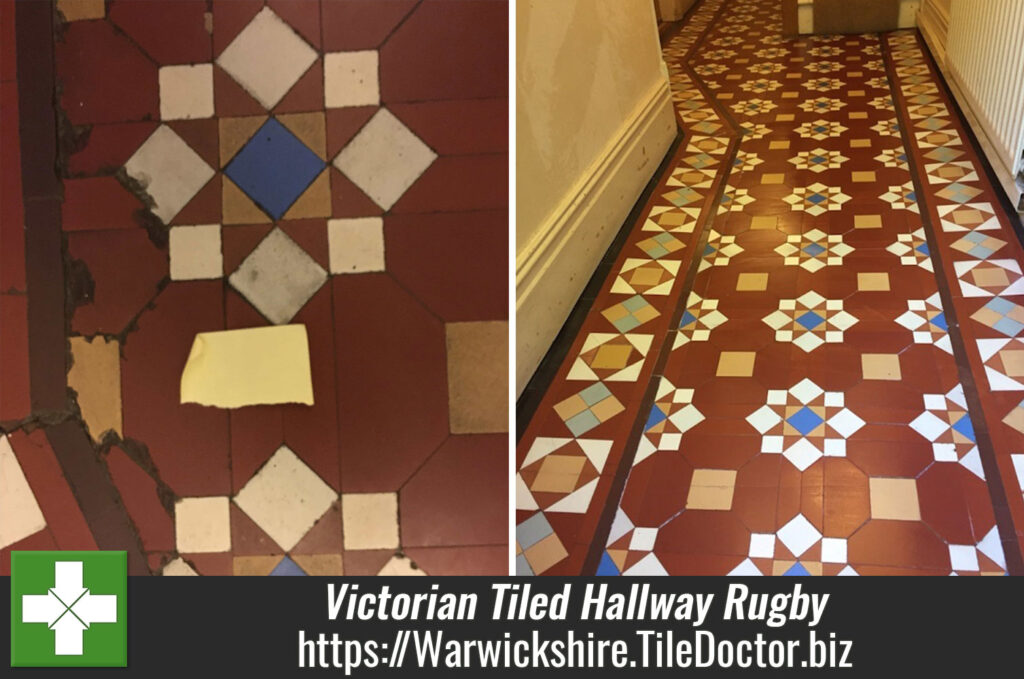
Victorian Tiled Hallway Floor Restoration Rugby

Victorian Tiled Hallway Floor Restoration Rugby

I was very pleased to be contacted by this client, they lived on a lovely residential road near the centre of Rugby in Warwickshire and the house featured a beautiful Victorian tiled hallway floor. As you will see from the pictures the patterns are stunning.

Victorian Hallway Floor Before Restoration Rugby
Over the years it had been badly damaged along the edges and a few tiles were cracked. It’s difficult to know the cause of the damage but we normally find problems like these can be caused by settlement in the floor and if heavy objects are dropped on the tiles. High traffic areas such as the hallway do get a lot of general wear and tear which takes its toll on the floor. The owner of the house felt embarrassed with the condition of the floor and had decided it was time to have it restored.

Victorian Hallway Floor Before Restoration Rugby

Cleaning and Restoring a Victorian Tiled Hallway Floor

I identified the colours used in the floor, so I could source replacements and went through the floor with the client to mark the tiles that needed changing. We left a few tiles with minor damage so that the new tiles did not stand out and kept the floor authentic.

I managed to source some replacement tiles and started the job by removing and replacing all the damaged and loose tiles. Many of the replacements had to be hand cut to size, especially in the corners. It took some time but eventually, all the damaged tiles were removed and replaced, and the loose tiles refitted. The floor was then left for a few days to set.

On my return, I started by giving the floor a deep clean by spraying the tiles with a strong dilution of Tile Doctor Remove and Go. This was left on the tiles to soak in and break up the bonding agent in the old coatings. After ten minutes I worked the solution into the tiles with a black scrubbing pad fitted to a rotary floor buffer and then rinsed the resulting soil off the floor with water and extracted it using a wet vacuum.

Victorian Hallway Floor During Cleaning Rugby
The next step was to give the floor an acid wash using Tile Doctor Acid Gel, we don’t normally use acidic products on tile or stone however they are particularly good at dealing with alkaline mineral salts and removing grout smears. Old floors like these are particularly vulnerable to a natural process called efflorescence which results in white mineral salt deposits being left on the surface of the tile as the floor fully dries out and can interfere with the sealer. To counter this, the floor was given an Acid Wash with Tile Doctor Acid Gel which being in Gel form makes it particularly easy to control. The acid in the gel works by neutralising the alkalinity in the floor. The solution was scrubbed into the floor using a coarse diamond encrusted burnishing pad to improve the finish of the tiles and then thoroughly rinsed with water and extracted with a wet vacuum to remove any trace of cleaning product.

Sealing a Victorian Tiled Hallway Floor

After leaving the floor to thoroughly dry out over a few days I returned to complete the sealing process. On my return, the floor was sealed with few coats of Tile Doctor Seal and Go Extra which leaves a nice satin finish and being a fully breathable sealer is ideal for old floors that have no damp proof membrane and needs moisture to rise through the tile, so it can evaporate.

Victorian Hallway Floor After Restoration Rugby
The vibrant colours of the tiles were brought back to life and the floor was transformed. The client was delighted and wondered why they had not called upon us sooner!

Victorian Hallway Floor After Restoration Rugby
 

Professional Restoration of a Victorian Tiled Hallway in Warwickshire

Victorian Tiled Hallway Floor Restoration Rugby Read More »

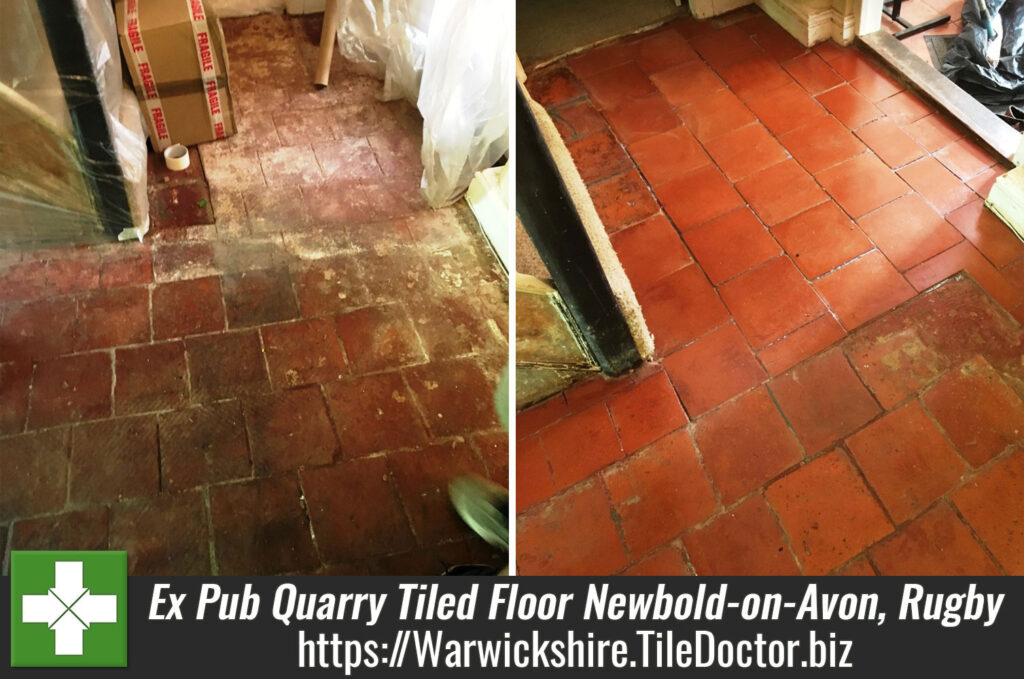
Ex Pub Quarry Tiled Floor Restored to Fantastic Condition in Newbold-on-Avon, Rugby

Ex Pub Quarry Tiled Floor Restored to Fantastic Condition in Newbold-on-Avon, Rugby

Pubs have been though a decline in the last ten years with one in five closing due to increased business rates and some believe the ban on smoking has had a part to play. My client saw this particular pub come up for sale in Newbold-on-Avon near Rugby and snapped it up with the intention of turning the lovely thatched Cottage back into a home. It needed a lot of work though and I was called into to sort out the floor which was a mixture of 6×6 inch and 9×9 inch Quarry tiles. The tiles were in a bit of a state and there were also large sections of concrete in 3 areas that had been painted red to blend in with the tiles.

Quarry Tiled Floor Thatched Cottage in Rugby Before Quarry Tiled Floor Thatched Cottage in Rugby Before

Rebuilding and Cleaning a Quarry Tiled Floor

The customer wanted the Quarry tiled floor restoring and extended throughout the floor which meant a substantial amount of work would be required to remove the concrete, rebuild the foundation and level with screed and then fit around 100 reclaimed tiles not to mention cleaning and sealing.

Quarry Tiled Floor Thatched Cottage in Rugby During Rebuild Quarry Tiled Floor Thatched Cottage in Rugby During Rebuild

The work was hard going at times, especially knocking out the concrete and adding the screed surface to the right level. Once that was done worked moved quickly on to laying the new tiles and grouting them in. Overall it took three days just to rebuild the floor alone.

Quarry Tiled Floor Thatched Cottage in Rugby During Rebuild Quarry Tiled Floor Thatched Cottage in Rugby During Rebuild

The customer did not what the Floor to look too different between the old and new so once the tiling was done the whole floor was treated with Tile Doctor Remove and Go to remove traces of red paint and glue. The solution was scrubbed in using a rotary machine fitted with a scrubbing pad and then rinsed off with water and then extracted using a wet vacuum.

This improved the look of the tiles but it also revealed some grout haze issues on the original tiles and after digging up the floor earlier I was aware no damp proof course had been installed which is not unusual in these older properties. To counter the grout haze and deal with any potential efflorescence issues I gave the whole floor an acid wash with Tile Doctor Grout Clean-up which was scrubbed in and then rinsed off with water and extracted with a the wet vacuum. The tiles need to be dry in order to be sealed so I left the floor for 24 hours with a number of industrial Air Movers in place to aid the drying process.

Sealing a Quarry Tiled Floor

Upon my return to the house I checked for any dampness that could have damaged the performance of the sealer, thankfully, the floor was dry and ready to seal, and so I proceeded to apply several coats of Tile Doctor Seal & Go Extra.

Seal & Go Extra is a fully breathable sealer that allows for effective moisture transmission, important where no damp proof course is installed. The sealer provides durable surface protection against dirt and stains, and is suitable for most kinds of internal, natural stone tiled floors, including Quarry, Victorian and Flagstone.

Quarry Tiled Floor Thatched Cottage in Rugby After Quarry Tiled Floor Thatched Cottage in Rugby After

The job took a week in total and as you can see from the photographs I successfully managed to restore the old tiles which with the addition of the cleaning and sealing have blended in well with the new tiles.

Quarry Tiled Floor Restoration in Warwickshire

Ex Pub Quarry Tiled Floor Restored to Fantastic Condition in Newbold-on-Avon, Rugby Read More »

Victorian Quarry Tiled Church Floor Refurbished in Frankton

Victorian Quarry Tiled Church Floor Refurbished in Frankton

These beautiful Quarry tiled floors belong to a 13th century church in the heart of the old village of Frankton. I did some research on the internet and discovered that the church had gone through a major restoration in 1872 so it’s most probable the tiles date back to that time.

Victorian Floor Tile Cleaning Frankton Church

Cleaning Victorian Tiles

There were multiple quarry tiled floors that were all in need of a deep clean and seal; however there was concern that cleaning the tiles using conventional cleaning methods requiring a lot of water could result in damp permeating into the structure of the building and considering the age of the building may this could cause damage. With this in mind I ran some tests to work out an alternative and I worked out that the best alternative would be to use Acid Gel which would stay in place followed by a steam clean.

Victorian Floor Tiles Frankton Church Before Cleaning Victorian Floor Tiles Frankton Church Before Cleaning

There was quite a lot of floor to cover and I need to work in relatively small sections so it took two days to complete the cleaning. I used the method I worked out earlier applying Acid Gel, and then leaving it to dwell for ten minutes before working it in with a black scrubbing pad fitted to a buffing machine. The gel and resultant soil was then removed with a wet vacuum and then the section was steam cleaned to lift out any further dirt and neutralise the acid.

Victorian Floor Tiles Frankton Church During Cleaning

Sealing Victorian floor tiles

On the third day I returned to seal the floors; there are a number of sealers I could have used for this type of floor however with the building being as old as it was I wanted to ensure the tiles could breathe and any damp could rise up through the tiles. Additionally I wanted the sealer to bring out the best in the tiles so with these points in mind I sealed the floor using four coats of Tile Doctor Seal and Go extra which covers all these points and is the recommended sealer for Victorian and Quarry tiles.

Victorian Floor Tiles Frankton Church After Sealing Victorian Floor Tiles Frankton Church After Sealing

I think you will agree the floors now look fantastic and with the sealer to protect them they should stay this way for some time to come, although give the amount of traffic these floors receive I will be working out a maintenance plan for them.

Restoring old Victorian Quarry tiles in a Warwickshire Church

Victorian Quarry Tiled Church Floor Refurbished in Frankton Read More »

Slate Tiles After Cleaning in Broadwell

Milled Slate Tiled Floor Cleaned and Sealed in Broadwell

These mixed milled slate floor tiles were installed in the Kitchen, Hall and toilet of a house in Broadwell, Warwickshire. The Slate was staining easily from drink spills and proving hard to clean; on top of that all the tiles were covered in a slight grout haze and had not been sealed or cleaned properly after installation. The customer needed the floor to be easy to clean and manage and was keen to bring out the rich colour and texture of the floor but keep a matt finish.

Slate Tiles Before Cleaning in Broadwell1 Slate Tiles Before Cleaning in Broadwell2

Cleaning black slate floor tiles

The first job was to give the floor a deep clean using Tile Doctor Pro-Clean which was worked into the pores of the Slate tile and grout using a slow speed rotary machine fitted with a scrubbing pad. I then used a wet vacuum to remove the resultant soiled solution and rinsed the floor down with water.

Removing Grout Haze from Slate

The next step was to tackle the grout haze which was evident across the tiles; for this we used Tile Doctor Grout Clean-Up which is an acidic product that you allow to dwell on the tile for a one to two minutes and then agitate with a scrubbing pad and then remove shortly afterwards with a wet vacuum washing the floor down quickly to ensure the acid is removed.

Further cleaning was required to some areas which had proven stubborn to clean earlier and for this we used Pro-Clean again mixed 50/50 with NanoTech UltraClean which adds tiny abrasive particles to make a more effective cleaning product; again this was scrubbed in and then once we were happy with the result the floor was washed down with clean water in order to neutralise it before sealing.

Sealing Slate floor tiles

I left the floor overnight to dry then came back next day and used a damp test meter to verify the floor was dry and ready for sealing. Once happy I proceed to apply four coats of Tile Doctor Colour Grow which matched their requirements in a sealer exactly as it provides a matt finish brings out the colour in the stone and offers great stain protection.

Slate Tiles After Cleaning in Broadwell1 Slate Tiles After Cleaning in Broadwell5


Slate tiled floor cleaned and sealed in Warwickshire

Milled Slate Tiled Floor Cleaned and Sealed in Broadwell Read More »

Sandstone Flagstones After Sealing

Sealing Sandstone Flagstones in Stretton under Fosse

These Sandstone flagstones were in the hallway of a house in the 16th century village of Stretton under Fosse, Warwickshire. The flagstone floor was in good condition however it had never been sealed so every time it was cleaned the cleaning product soaked into the floor and was less effective also the customer wanted to reveal the natural colours in the Sandstone and needed some of the grout repairing.

Cleaning Sandstone Flagstones

The first job was to clean and flush the flagstone so we set about cleaning the stone using Tile Doctor Pro-Clean mixed 50/50 with NanoTech Ultra-Clean and further diluted with water. I often use this combination, Pro-Clean is a strong and effective alkaline cleaner whilst NantoTech adds tiny abrasive particles that assist and speed up the cleaning process.

Sandstone Flagstone Cleaning
The solution was applied using a mop and then worked into the floor using a rotary buffing machine fitted with a black 17” scrubbing pad. The soiled cleaning solution was then picked up off the floor using a wet and dry vacuum and the floor was given a thorough wash down with clean water to remove a trace of cleaning products that may impact the sealer. There were a few areas of grout that had cracked and become lose so we set about replacing the grout with a closer match as possible and then left for the day to allow the floor to try overnight.

Sandstone Flagstones Before Sealing Sandstone Flagstones Before Sealing Close-Up

Sealing the Flagstone Floor

We sealed the Sandstone flagstones with a single coat of Tile Doctor Colour Grow, there are a number of sealers we could of used for this floor all have different effects and differing levels of stain protection against spills but Colour Grow is really durable and helps to bring out the deep colour from within the stone . To finish and build up the lustre and richness of the colour we then applied seven coats of Seal & Go which add a nice low sheen to the surface of the tile.

Sandstone Flagstones After Sealing Sandstone Flagstones After Sealing Close-Up


Cleaning and Sealing Sandstone Flags in Stretton under Fosse

Sealing Sandstone Flagstones in Stretton under Fosse Read More »

Quarry Tile Floor After Restoration

Removing Tar from Quarry Tiles in Rugby

This Quarry Tiled floor was in a house in the village of Clifton-upon-Dunsmore which is close to Rugby; the tiles had been covered in an unattractive damp proof tar membrane and then hidden under carpet for many years and the owner wanted the floor restoring.

Quarry Tile Before showing tar on floor Quarry Tile Before showing tar on floor

Quarry Tile Tar Removal

To remove the tar membrane the Quarry Tiled floor was coated with Tile Doctor Remove and Go mixed 50/50 with NanoTech Ultra-Clean and left to dwell for 30 minutes to an hour. We then scrubbed the floor using a rotary machine fitted with a black scrubbing pad, the combined effect of the chemicals and scrubbing action broke down the tar and loosened it from the surface of the tile and was then removed with water and a wet Vacuum. It took a whole day to complete the floor as it was necessary to remove the tar in 2 metre square sections.

Quarry Tile Tar Removal in progress
The following day the floor was washed down with Tile Doctor Grout Clean-Up which is an Acid based product ideal for removing the salt in the floor, all the edges were done by hand with a tar remover solvent and steel wire wool then washed down again 4 times with cold water before being rinsed with a high pressure spinner tool.

The last step was to use a warm air dryer to speed dry the floor before it was sealed. For this we used two coats of Tile Doctor Colour Grow which is a breathable sealer that will provide durable stain protection as well as allowing vapour transmission a necessary feature for old floors with no damp proof course.

Quarry Tile Floor After Restoration Quarry Tile Floor After Restoration


Quarry Tile Restoration in Rugby

Removing Tar from Quarry Tiles in Rugby Read More »

=================================

Warwickshire Tile Doctor

================================= Read More »
Scroll to Top