Grout Cleaning

Welcome to my Work History archive where you will find detailed examples of the cleaning and renovation of Grout carried out in Warwickshire

Cleaning and Renovating Grout

The top layer of grout is porous and can absorb grease, dirt and limescale. Spillages such as wine, lemonades or greasy substances will cause marks and patches in the joints in the floor. Grout between wall-tiles particularly in damp areas like bathrooms will become dirty and unattractive as a result of Mould, Mildew and Limescale.

Mould is one of the most unsightly problems, which usually starts off in the wettest area of the room, this could be the bottom of the shower or bath, then starts to spread and if left unchecked could cover a large area of the wall.

Another common issue we find is a problem known as Grout Haze or Grout Smearing where a thin layer of grout has been left to set on the surface of the tile. Once grout has set it is difficult to remove.

Discolouration of grout joints in bath or shower areas due to continued use of acid formulated shampoos and soaps. This causes yellow orange and pink stains to the grout over even a short period of time. Whilst Grout Joints can be cleaned, badly stained grout may need to be re-coloured.

Protecting your grout in advance with a sealer will prevent most of these issues and although relatively unknown in the UK, protection awareness is growing. Sealing forms an invisible barrier between the grout and the surface, this will then protect your investment for years to come.

We have solutions for all the problems listed above and below you will find detailed examples of work we have carried out in the past to resolve many of these issues. It should give you some idea of what’s involved and what can be achieved with the right techniques and products.


Limestone Floor Tile and Grout Renovation Southam

Soiled Limestone Floor Tile and Grout Renovated in Southam

Details below of an impressive Limestone Floor installed at a large county house in the historic market town of Southam. I had been asked to deep clean the limestone floor tiles and grout lines in the kitchen and adjacent hallway. They had been previously cleaned by another company a few years ago and they now needed doing again.

Limestone Floor Tile and Grout Before Cleaning Southam

I went over to survey the tiles and provide a quote as requested. The stone was dirty but in good shape, I could see the previous sealer had started to fail in the busiest areas and this was now letting dirt become trapped in the pores of the stone. The main problem though was the grout which had a very rough surface and was heavy contaminated with acrylic sealer.

Limestone Floor Tile and Grout Before Cleaning Southam Limestone Floor Tile Grout Before Cleaning Southam

Cleaning and Burnishing Limestone Tiles

Before beginning the work, I took the precaution of adding a clear silicone sealant between the kitchen units and tile. This is needed to prevent any water used during the cleaning process from soaking into the woodwork and damaging it.

Limestone Floor Tile and Grout During Preparation Southam

Once that was done work started on talking the grout which had to be rubbed back using handheld diamond blocks which was able to cut through and remove the acrylic sealer and dirt along with it. All the grout lines had been treated in this way and so realising it was going to be a tough job I had arranged for Steve Carpenter from Nottinghamshire Tile Doctor to lend me a hand for two days.

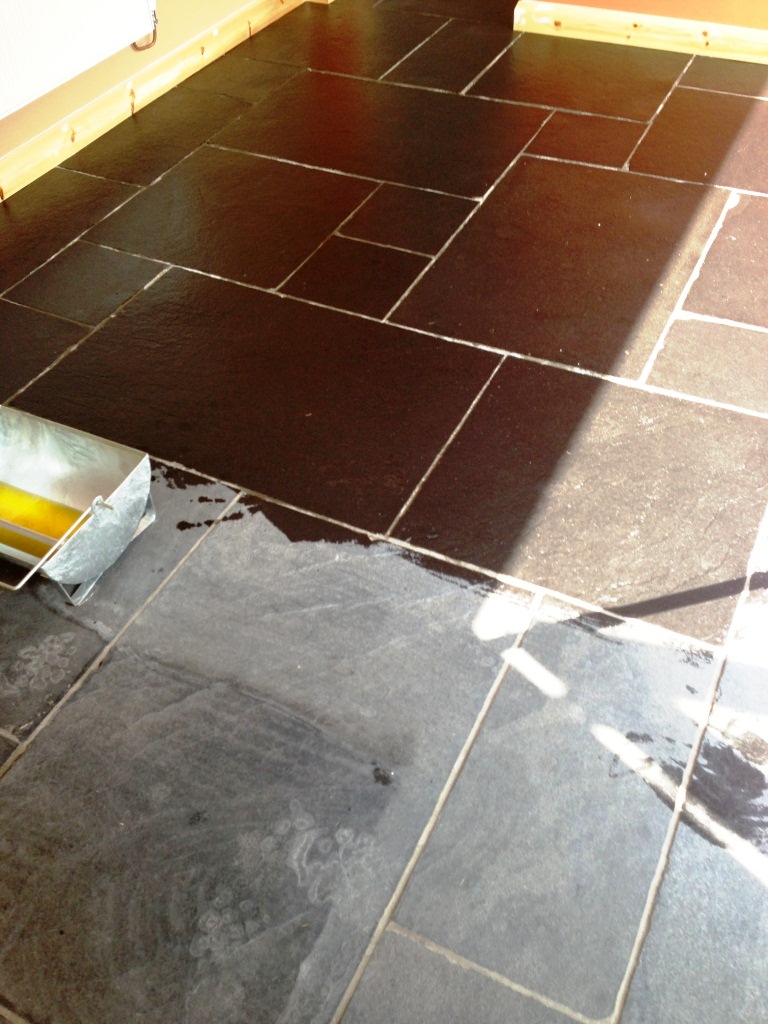
After resolving the grout issues, I moved on to restoring the appearance of the Limestone tiles themselves. This was done coarse diamond encrusted Burnishing Pads. Each pad has a different level of grit to grind away the dirt from the stone and build up the polished appearance. The process effectively resurfaces the stone leaving it looking new and fresh.

The process started with the application of a coarse 200-grit pad, fitted to a rotary machine, to grind away any excess muck and sealant lubricated with a little water and Stone Soap cleaning fluid. The resultant slurry was rinsed away and I followed up with the application of the 400-grit pad again with a small amount of water and Stone Soap.

Sealing Limestone Tiles

The last step was to seal the floor and after discussing this with the owner previously it was clear they wanted the Limestone to keep its light appearance and look as natural as possible. With that requirement in mind, we sealed the floor using a couple of coats of Tile Doctor Ultra Seal which is a premium impregnating sealer that is almost invisible and doesn’t alter the look of the stone. It works by soaking into the stone, occupying the pores, and thereby preventing dirt from becoming lodged there, this keeps the dirt on the surface where it can be easily cleaned away. Ultra-seal is also an excellent grout sealer.

Limestone Floor Tile and Grout After Cleaning Southam Limestone Floor Tile and Grout After Sealing Southam

After three days of hard work by the team working the Limestone and Grout was looking so much better and was a massive improvement. The new sealer will also ensure the stone and the grout is much easier to maintain going forward.

Limestone Floor Tile and Grout After Cleaning Southam Limestone Floor Tile and Grout After Cleaning Southam


My customer was very happy with the floor and pleased it would be easier to clean from now on. Regarding cleaning, I recommended they use Tile Doctor Stone Soap which is a gentle yet effective tile cleaner that won’t impact the sealer.


Professional Cleaning of a Limestone Tiled Floor in Warwickshire

Soiled Limestone Floor Tile and Grout Renovated in Southam Read More »

Travertine Kitchen Tile Deep Cleaned Polsihed Stratford-upon-Avon Warwickshire

Dull Travertine Floor with Grubby Grout Renovated in Stratford-upon-Avon

This large Victorian house in Stratford-upon-Avon, had a lovely Travertine tiled floor installed in the kitchen and dining area. Over the years the tiles had lost their shine and the grout had darkened with trapped dirt. The owners had decided it was time to have it professionally cleaned and I was called in to quote for the renovation.

Travertine Kitchen Floor Before Polishing Stratford-upon-Avon

I visited the property to survey the floor, run some tests and discus with the client their main concerns. From that I was able to work out an accurate price for the work which was accepted and a date arranged to carry out the work.

Cleaning a Travertine Tiled Kitchen Floor

First, I cleaned the grout lines using Tile Doctor Stone Soap which was run along the grout lines and scrubbed in with a brush. It was the grout that needed the most attention and I suspect it wasn’t sealed along with the Travertine when it was laid.

The now soiled cleaning solution was extracted with a wet vacuum, keeping the mess to a minimum. I repeated this process as a few areas that were near the cooking areas which were particularly dirty.

Next, I turned my attention to the Travertine tiles which were actually in great condition and only really needed a polish to buff them up. To do this I used a very fine 3000-grit burnishing pad which used very fine industrial diamonds to burnish the stone and restore its polished appearance. This gentle action of the pad brings up the shine very gently without damaging the stone. The pad is fitted to a rotary floor buffer and run over the floor with a small amount of water which is sprayed onto the tile.

Sealing a Travertine Tiled Kitchen Floor

Once the burnishing was done, I brought the polish finish up further by working Tile Doctor Shine Powder into the Travertine using a white buffing pad. This is a crystalising powder that adds a durable and protective deep shine to the tile.

Travertine Kitchen Floor After Polishing Stratford-upon-Avon

Once complete the Travertine sheen had been restored to the Travertine tiles and looked so much cleaner, additionally the colour had been restored to the grubby grout lines and it was this that had really been bringing the floor down.

The client was very happy with the work we carried out and before leaving I took time to discuss aftercare cleaning for which I recommended the use of Tile Doctor Stone Soap. This product has been specially designed for maintaining the patina on polished floors and has a gentle formula that won’t erode the protection provided by the shine powder crystals.


Professional Renovation of a Travertine Tiled Kitchen in Warwickshire

Dull Travertine Floor with Grubby Grout Renovated in Stratford-upon-Avon Read More »

Grout Haze Removed from new Terracotta Tiles at Malvern Village

Unsealed Terracotta Kitchen Tiles Treated for Grout Haze in Malvern

Newly built properties are not without their problems and often take a while to resolve all the snagging which occasionally extends to resolving problems with newly laid tiled floors. At this new property in the village of Malvern, and overlooked by the Malvern hills, the builders had left the Terracotta tiled kitchen floor covered in grout smears (also known as Grout Haze) following installation. They had also neglected to seal the tiles, which was actually quite fortunate in this case as they would have sealed in the grout haze, making it more difficult to remove.

Naturally, the property owner wanted the problem to be resolved as soon as possible, and for me to make the tiles easy to keep clean in future, which can be achieved by sealing the tile.

Grout Haze Removed from new Terracotta Tiles at Malvern Village

Removing Grout Haze from a Terracotta Tiled Floor

Before starting work, I made sure to fully protect any exposed woodwork with a plastic sheet covering to protect them from potential damage. I then proceeded to give the floor a thorough clean, using Tile Doctor Remove and Go to clean the floor and eradicate some stains that had been left behind as a result of the building work.

Grout Haze Removed from new Terracotta Tiles at Malvern Village Grout Haze Removed from new Terracotta Tiles at Malvern Village

Next, I paid special attention to the grout, where the very visible problem of grout haze had arisen. To neutralise these smears I used Tile Doctor Grout Clean Up, a concentrated phosphoric acid cleaner that can also remove alkaline mineral deposits and efflorescence. Grout Clean Up is only to be used on acid resistant stone, as sensitive stone can suffer from irreparable etching if it comes into contact with the product.

Once completely clean and free of grout smears the floor was thoroughly rinsed with water to remove any trace of product and then dried as much as possible with a wet vacuum, afterwards an air mover was installed to speed up the drying process.

Sealing a Terracotta Tiled Floor

Later that afternoon the floor was dry and I was able to apply a sealer. To do this I opted to use several coats of Tile Doctor Seal and Go Extra, a topical, fully breathable sealer that works really well on Terracotta.

Grout Haze Removed from new Terracotta Tiles at Malvern Village
The sealer builds up a layer of protection on the surface of the tiles, protecting against ingrained dirt and stains. Seal and Go Extra also provides a high quality sheen finish which really did well to enhance the look of the Terracotta.

Grout Haze Removed from new Terracotta Tiles at Malvern Village
The property owner was exceptionally pleased with the results, and to have this problem dealt with quickly and efficiently, additionally the sealer will ensure the Kitchen floor is easy to keep clean in the future.

Grout Haze Removal on Terracotta Tiles in Worcestershire

Unsealed Terracotta Kitchen Tiles Treated for Grout Haze in Malvern Read More »

Travertine Stratford-upon-Avon After Cleaning

Travertine Tiled Floor Polished in Stratford upon Avon

Following on from a referral I agreed to travel down to Stratford upon Avon and deep clean this Travertine tiled floor which had not been professionally cleaned for over eight years and was now looking rather dull as you can see in the photograph below, additionally the holes in the travertine had not been filled and was allowing dirt to get trapped into the tile.

Travertine Stratford upon Avon Before Cleaning

Cleaning, Filling and Polishing Travertine Tiles

The first job was to wash the floor down with Pro-Clean to give it a general clean and remove any surface dirt and grit from the floor and then fill the holes with a colour matching grout; there were quite a few holes to fill so this task took some time to complete. Polished Travertine is a very hard stone so restore its finish it needs to be cut back and polished using of a set of diamond encrusted burnishing pads fitted to a rotary machine. You start with a coarse pad with a little water, then a medium pad, fine pad and finish with a very fine polishing pad, this takes some time but the effect it quite transforming, it does build up slurry on the floor so it all needs to be washed down again at the end.

Sealing and Buffing Travertine Tile

To keep the floor looking good for longer and protect it from stains it does need to be sealed so once it was dry it was sealed using two coats of Tile Doctor Colour Grow which is a colour enhancing sealer that brings out the colours in natural stone. Then once the sealer was dry it was buffed using a white buffing pad to make sure that I hadn’t left any residues from the seal.

Travertine Stratford upon Avon After Cleaning
The job took three days to complete in total and I think you will agree it’s now looking much healthier.

Travertine tiled floor maintained by Greater Manchester Tile Doctor

Travertine Tiled Floor Polished in Stratford upon Avon Read More »

Slate Tiles After Cleaning in Broadwell

Milled Slate Tiled Floor Cleaned and Sealed in Broadwell

These mixed milled slate floor tiles were installed in the Kitchen, Hall and toilet of a house in Broadwell, Warwickshire. The Slate was staining easily from drink spills and proving hard to clean; on top of that all the tiles were covered in a slight grout haze and had not been sealed or cleaned properly after installation. The customer needed the floor to be easy to clean and manage and was keen to bring out the rich colour and texture of the floor but keep a matt finish.

Slate Tiles Before Cleaning in Broadwell1 Slate Tiles Before Cleaning in Broadwell2

Cleaning black slate floor tiles

The first job was to give the floor a deep clean using Tile Doctor Pro-Clean which was worked into the pores of the Slate tile and grout using a slow speed rotary machine fitted with a scrubbing pad. I then used a wet vacuum to remove the resultant soiled solution and rinsed the floor down with water.

Removing Grout Haze from Slate

The next step was to tackle the grout haze which was evident across the tiles; for this we used Tile Doctor Grout Clean-Up which is an acidic product that you allow to dwell on the tile for a one to two minutes and then agitate with a scrubbing pad and then remove shortly afterwards with a wet vacuum washing the floor down quickly to ensure the acid is removed.

Further cleaning was required to some areas which had proven stubborn to clean earlier and for this we used Pro-Clean again mixed 50/50 with NanoTech UltraClean which adds tiny abrasive particles to make a more effective cleaning product; again this was scrubbed in and then once we were happy with the result the floor was washed down with clean water in order to neutralise it before sealing.

Sealing Slate floor tiles

I left the floor overnight to dry then came back next day and used a damp test meter to verify the floor was dry and ready for sealing. Once happy I proceed to apply four coats of Tile Doctor Colour Grow which matched their requirements in a sealer exactly as it provides a matt finish brings out the colour in the stone and offers great stain protection.

Slate Tiles After Cleaning in Broadwell1 Slate Tiles After Cleaning in Broadwell5


Slate tiled floor cleaned and sealed in Warwickshire

Milled Slate Tiled Floor Cleaned and Sealed in Broadwell Read More »

Limestone Kitchen Part Sealed

Resolving installation issues with a black Limestone tiled floor

This client had recently had a black limestone tiled floor installed in the kitchen and dining area in his home on the northern border of Warwickshire. Unfortunately however the tiler had not sealed the tiles prior and struggled to remove the grout smears from the Limestone surface. The tiles were then sealed trapping the grout haze under the sealer; naturally the client was far from happy and was instructed to remove the grout using an acid wash.

Black Limestone Tiles Before Black Limestone Tiles Before

The acid things turned the floor grey removing the oils in the floor from the factory and also caused the natural salts within the tile to rise to the surface. The tiles were then sealed with an external patio sealant without removing the existing surface sealer. All this compounded the problems in the floor causing it to mark easily and lose its colour; on top of that it had big cloudy white patches all over from the trapped salts.

Stripping sealer from a Limestone Floor Tiles

To resolve the problems with the floor it had to be fully stripped back and cleaned of all sealants and salt etc. which was done by applying a solution of Tile Doctor Remove and Go combined with Nanotech UltraClean mopped on to the floor in two square metres at a time. The solution was allowed to soak into the floor for thirty minutes to allow the chemicals break down and then scrubbed using a rotary machine fitted with a black pad. The soiled solution was then extracted from the floor using a wet vacuum. This process was repeated across the entire floor until all the sealer had been removed.

Limestone Kitchen Floor After Cleaning

Removing Salts from Limestone Tiles

To remove the salts and remaining grout haze the floor was treated with Grout Clean-up which is an acid based cleaning product that is designed to penetrate below the surface and remove light grout smears (grout haze) as well as mineral deposits such as salts and efflorescence, again this treatment was applied two square meters at a time, quickly worked into the floor and removed with the wet vacuum. Once this process was complete the whole floor was washed at high pressure rinse three times to ensure all trace of chemicals had been removed.

The floor was left to dry and when we came back the second day it was noticed that there were still some salts coming through to the surface of the Limestone, these areas were re-treated and the floor washed down again and left to dry as before.

Limestone Kitchen Part Sealed

Sealing Limestone Floor Tiles

The floor looked much improved on the third day although it was still looking washed out. To put the colour back into the black limestone it was treated with stone oil with turns the floor back to black and then sealed with two coats of Tile Doctor Colour Grow which will protect the tile going forward.

The floor now looks how it was intended and certainly the customer was pleased and left the following comment on our feedback system.

“We are so pleased with the work carried out by the tile doctor to our kitchen, utility and family room. The floor now looks exactly how we hoped it would look when we originally purchased it. We’ve struggled to get it looking right since then and now we feel we finally have a floor we can enjoy at last! We also found Mick to be professional and highly knowledgeable on our floor. He has given us really good advice and has been really easy to contact and has also been happy to give us further help and advice over the phone even when the job’s been completed. L. Nash”

Limestone Kitchen Floor After Cleaning and Sealing Limestone Kitchen Floor After Cleaning and Sealing

Limestone installation problems resolved in Warwickshire

Resolving installation issues with a black Limestone tiled floor Read More »

Slate Hallway After Cleaning and Sealing

Removing Grout Haze from Slate Tile Flooring

You may remember a previous Limestone floor job we did for a Mrs Schwartz from Stourbridge, well true to her word she invited us back to clean and seal the slate tile flooring in her hallway which had been left with grout smears (aka grout haze) on the surface after tiling. Grout smears can be removed however if the floor is sealed it’s necessary to remove the sealer first.

Slate Hallway Before Cleaning

Cleaning Grout Haze off Slate Tile Flooring

To remove the sealer and clean off the grout smears we used a 50/50 mix of Tile Doctor Remove and Go combined with Nanotech Ultra-Clean for added effect, the solution was left to dwell on the surface of the slate for 15 minutes to break down the polymers in the grout. The next step was to turn on a high pressure spinner tool which is a very effective cleaning tool on its own; the water from the spinner tool also washes away any chemicals and neutralises the floor ready for sealing.

Slate Hallway Before Cleaning

Sealing Slate Tiles

We speed dried the slate tile flooring using a number of industrial fans and applied three coats of Tile Doctor Seal and Go which offers a good combination of stain resistance with a low sheen finish that brings out the natural colours in the slate.

Slate Hallway After Cleaning and Sealing Slate Hallway After Cleaning and Sealing


Cleaning and Sealing Slate Tile Flooring in Stourbridge

Removing Grout Haze from Slate Tile Flooring Read More »

Before and After photos of a Polished Limestone Floor Tiles

Limestone Floor Tiles Polished

Limestone Floor Tiles Polished to a deep shine

Great photograph below of a Limestone floor in the kitchen of a house near Coventry. The Limestone had lost it’s shine after the application of a surface sealing “Clean and Shine” type product; the problem was akin to the application of a wax finish which in turn had been contaminated with cleaning product and soil underneath. The grout line has also become heavily soiled through everyday use.

Cleaning Limestone Floor Tile

First the Limestone tiled floor was dry vacuumed to remove loose grit; we also took to opportunity to remove the kitchen unit kick boards. This was followed by a good clean with a 1:5 mix of Tile Doctor Pro-Clean which was left to dwell for 15 minutes before the application of a stiff grout brush on on the grout lines followed by the use of a slow speed buffing machine to break up the surface wax on the tile. The whole are was rinsed down using high pressure clean water via a spinner tool which removed any left over dirt from the grout lines.

The next step was to use the diamond encrusted burnishing pads system to prepare and condition the limestone floor tiles prior to polishing.

Before and After photos of a Polished Limestone Floor Tiles
Before and After

Adding that deep shine to Limestone Tiled Floors

We then applied Tile Doctor Shine Powder using a White buffing pad to provide that extra deep shine you can see in the photograph, it also provides and tough durable finish.

Limestone Tiled Floor Cleaning and Polishing

Limestone Floor Tiles Polished Read More »

=================================

Warwickshire Tile Doctor

================================= Read More »

Scroll to Top