tiled floor

Black Limestone After Cleaning Pillerton Hersay

Restoring a new laid black Limestone floor in Pillerton Hersey

This is the second black limestone tiled floor we have dealt with this year where the tiler struggled to get the right finish. In this case the floor tiles were newly fitted but unfortunately the tiler had decided not to seal the tiles prior to grouting which resulted in grout becoming trapped on the tile surface (aka Grout Haze). To remedy this problem brick acid was used which removed the grout but this stripped off the black finish turning the tiles grey then in a further attempt to improve the appearance the tiles were covered in boiled linseed oil which just sat on top locking in the grout haze. Linseed oil is a traditional method of sealing stone tiles and is normally used with Terracotta tiles but it’s not ideal and does not have the performance of a modern sealer, certainly in this case it didn’t help at all.

Black Limestone Before Cleaning Pillerton Hersay Black Limestone Before Cleaning Pillerton Hersay

Removing Oil and Grout from Limestone Tiles

To resolve the problems with the floor it had to be fully stripped back to remove the linseed oil so the grout haze problem could be tackled. This was done by applying a solution of Tile Doctor Remove and Go which was mopped on to the floor and left to soak in for a while before being scrubbed using a rotary machine fitted with a black pad. This process lifted the linseed oil off the tiles and was removed using a wet vacuum.

Once the Linseed oil was gone I could get to work on the grout haze and for that we have a special product called Grout Clean-Up, it’s a very strong acid based product and normally you would need to be very careful using it on stone as it can damage the stone, in this case however the surface of the Limestone had already been damaged by the brick acid. Once the floor was free of coatings and the grout haze problem had been treated I gave the floor a thorough rinse down to make sure all trace of products had been removed from the floor before the next step.

Sealing Limestone Floor Tiles

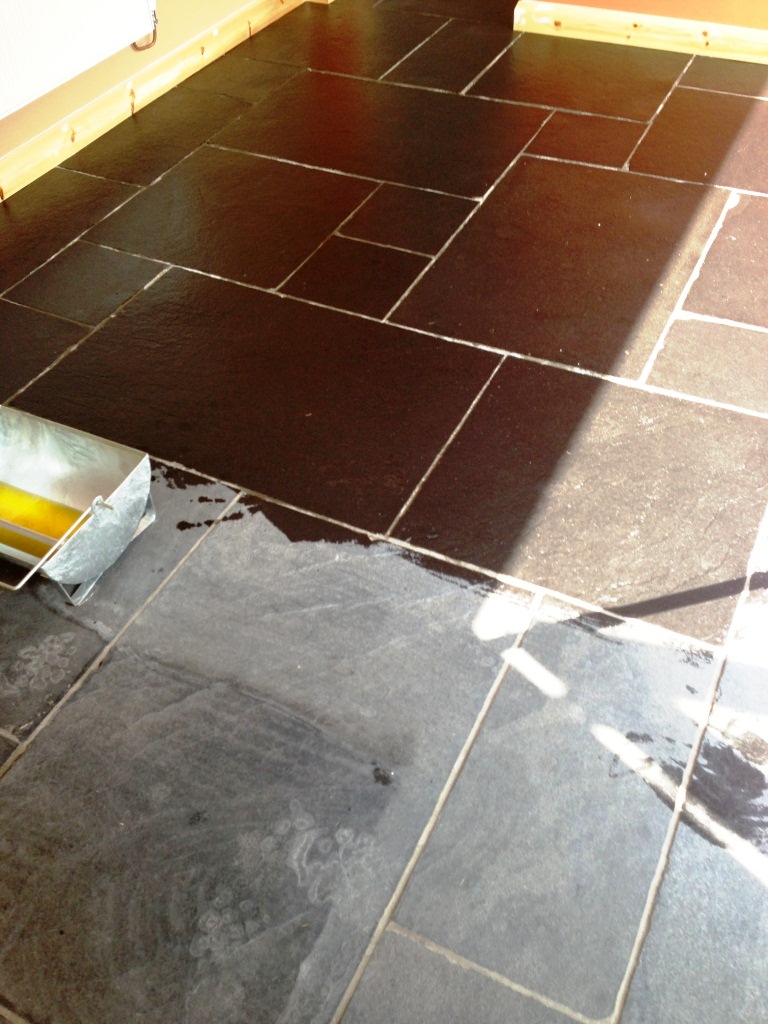
There was a lot of Limestone to cover so on the first day I focused on the kitchen and on day two the lounge, hallway and toilet. On the third day I went over the whole area applying Tile Doctor Stone Oil to restore the black colour of the Limestone that had been damaged by the brick acid.

Black Limestone During Cleaning Pillerton Hersay
By the third day the Grout Haze was gone but was still looking washed out. To restore the colour back into the black limestone it was treated with stone oil which as you can see turned the tiles back to their original colour. Stone Oil is an interesting product, if you check the tin it will tell you it’s “an easy to apply pre-polish impregnating sealer, ideal for low porosity stone and terracotta designed to enhance the colour and texture of floors and improve mechanical strength once cured”. Certainly from the customer’s point of view the floor now looks how it was intended and they were much relieved.

Black Limestone After Cleaning Pillerton Hersay Black Limestone After Cleaning Pillerton Hersay


Resolving Limestone installation problems in Warwickshire

Restoring a new laid black Limestone floor in Pillerton Hersey Read More »

Terracotta Deep Clean Warwick After Sealing

Dirty Terracotta Tiles Deep Cleaned in Warwick

These photographs are from a Terracotta Tiled Kitchen at a house in the historic town of Warwick. You should be able to see from the photographs that the tiles had a heavy build-up of wax and oil coating which besides being very unsightly made them difficult to clean.

Terracotta Deep Clean Warwick before Terracotta Deep Clean Warwick before

Removing Wax and Oil from Terracotta Tiles

I knew I was going to struggle to remove the build-up of wax and oil so I decided to go apply Tile Doctor Remove and Go which is a product specifically designed to safely remove sealers and coatings from Tile and Stone. It was diluted and applied to the floor where it was left to soak into the tiles for a good twenty minutes before being worked in with a rotary machine fitted with a scrubbing pad.

The resultant soiled solution was removed using a wet vacuum and the floor washed down with clean water. At this point I could see more work was required so as well as applying more Remove and Go I also applied steam from a heavy duty steamer. Slowly but surely using a combination of the above tools and product the wax and oil was stripped from the floor.

Terracotta Deep Clean Warwick Wax Stripping
The next job was to give the floor a deep clean using a medium dilution of Tile Doctor Pro-Clean which was worked into the pores of the Terracotta tile and grout using a slow speed rotary machine fitted with another scrubbing pad. The dirty solution was removed and the floor rinsed thoroughly with water, again we used the wet vacuum to remove the water and get the tile as dry as possible.

Terracotta Deep Clean Warwick After Cleaning Terracotta Deep Clean Warwick After Cleaning

Sealing Terracotta floor tiles

I left the floor overnight to dry overnight with the assistance of an air blower and then came back next day to seal the floor; I used a damp test meter first to verify the floor was dry and ready for sealing. Once happy I proceed to apply three coats of Tile Doctor Ultra Seal which is a no-sheen, natural-look penetrating sealer that provides maximum stain protection by occupying the pores in the tile. It’s also highly recommended for use in in food preparation and serving areas

Terracotta Deep Clean Warwick After Sealing
It was a tough job but the results were well worth the effot.

Terracotta tiled floor stripped, cleaned and sealed in Warwick

Dirty Terracotta Tiles Deep Cleaned in Warwick Read More »

Victorian Tiled Floor Refresh Radford After

Victorian Tiled Hallway Refreshed in Radford

This Victorian Tiled Hallway at a house in Radford near Coventry had been well preserved under a carpet for many years and the owners of the house now wanted it brought back to life. Physically the tiles were in good condition however they did suffer from the usual issues of paint splashes and adhesive stuck to the surface.

Victorian Tiled Floor Refresh Radford Before Victorian Tiled Floor Refresh Radford Before

Cleaning Victorian Tiles

To clean up the tiles and remove the paint and glue I used a dilution of Tile Doctor Remove and Go. The edges of the floor was done first as this was where the most pain splashes were to be found due to the skirting being painted at some point in the past. The usual procedure still applied allowing the product to soak in and soften the paint before being scrubbed off by hand. Once the edges were done I moved onto the main part of the floor using the same process however this time I had the advantage of being able to use a rotary machine fitted with a scrubbing pad. The dirty solution was rinsed away with water and removed with a wet vacuum.

To finish off and remove some signs of efflorescence (white salt stains) the tiles were then scrubbed in a dilution of Tile Doctor Grout Clean-Up. This did the trick but you can’t leave this product on the tiles for too long as its an acid so as soon as it had done its job it was washed off and then the tiles were then given a thorough wash down with clean water.

My work was done for the day so I left a fan running to help speed dry the floor overnight and left for the day.

Sealing Victorian floor tiles

I came back the next day to seal the floor using Tile Doctor Seal and Go sealer which provides stain protection as well giving a nice sheen to the tile, the tiles were quite porous and needed six coats before they were fully sealed.

Victorian Tiled Floor Refresh Radford After
 

Victorian tiled floor cleaned and sealed near Coventry

Victorian Tiled Hallway Refreshed in Radford Read More »

Victorian Tiled Hallway Coventry After Cleaning and Sealing

Victorian Tilled Hallway Refurbished in Allesley

Popular as they are in the UK it wasn’t long before I was called back to refurbish another Victorian Tiled Hallway Floor this time in the town of Allesley near Coventry. This tiles were heavily soiled and had been splashed with paint from decorating, on top of this there was evidence of adhesive from when the floor had been previously covered in carpet and there were a number of damaged tiles that needed replacing.

Victorian Tiled Hallway Coventry Before Cleaning Victorian Tiled Hallway Coventry Before Cleaning

Cleaning Victorian Tiles

To get the tiles clean of paint and dirt I decided to go straight for a dilution of Tile Doctor Remove and Go which was left to soak into the tiles for around thirty minutes before scrubbing it in with a rotary machine fitted with a scrubbing pad. The dirty solution was rinsed away with water and removed with a wet vacuum and stubborn areas and grout re-treated with a scrubbing brush by hand.

I wasn’t entirely happy with the condition of the tiles at this stage so the next step was to scrub in a dilution of Tile Doctor Grout Clean-Up which is an acid based product that removed grout haze, mineral deposits, rust stains and efflorescence. This did the trick but being an acid based product you can’t leave it on the tiles for too long and so was washed off soon after and the tiles washed down with clean water.

I scraped out the grout surrounding the damaged tiles and lifted them out, I had already arranged replacements so once that was done and tidied up it was just a question of putting the replacement in place with tile adhesive and re-grouting using a sympathetic grout colour to match the aged existing grout.

My work was done for the day so I left a couple of fans running to help dry the floor and left for the day.

Victorian Tiled Hallway Coventry Drying

Sealing Victorian floor tiles

I came back the next day to seal the floor using Tile Doctor High Shine sealer which provides stain protection as well as a very shiny finish; five coats were needed to get it fully sealed.

Victorian Tiled Hallway Coventry After Cleaning and Sealing Victorian Tiled Hallway Coventry After Cleaning and Sealing


Victorian tiled floor deep cleaned, repaired and sealed near Coventry

Victorian Tilled Hallway Refurbished in Allesley Read More »

Victorian Minton tiles cleaned and Sealed coventry

Victorian Minton Floor Refreshed in Coventry

This was a straight forward request to clean and re-seal a Victorian Minton tiled floor in Coventry. The tiles were in good condition but there were a few stubborn stains that needed dealing with.

Victorian Minton tiles cleaned and Sealed coventry Victorian Minton tiles cleaned and Sealed coventry

Cleaning Victorian Tiles

I used a concentrated dilution of Tile Doctor Pro-Clean to clean and strip the old sealer from the floor. It was first left to soak into the tiles for around 15 minutes before being scrubbed into the Victorian tile and grout using a slow speed rotary machine fitted with a scrubbing pad. The dirty solution was removed and the process repeated and grout lines scrubbed until I was happy the tiles were clean; this was then followed with a thorough rinse with water and a wet vacuum was used to remove the fluids and get the tile and grout as dry as possible. This process took most of the day so once the floor was clean I left for the day leaving it to dry overnight.

Sealing Victorian floor tiles

I came back the next day and after confirming the tiles had dried I began sealing them using six coats of Tile Doctor Seal and Go sealer which will provide stain protection as well as adding a nice shine to the floor. The interesting thing about Seal and Go is that’s it’s a water based sealer so you don’t get a smell as it dries.

Victorian Minton tiles cleaned and Sealed coventry Victorian Minton tiles cleaned and Sealed coventry


Victorian tiled floor cleaned and sealed in Coventry

Victorian Minton Floor Refreshed in Coventry Read More »

Victorian Tiles in Coundon Cleaned and Sealed

Victorian Floor Cleaned and Repaired in Coundon

Details below of a bread and butter job recently completed in Coundon near Coventry to Clean, repair and seal Victorian floor tiles. I call it a bread butter job as this is something we do a lot off and have therefore become quite proficient including colour matched repairs to grout and tile replacement.

Victorian Tiles in Coundon before cleaning

Cleaning Victorian Tiles

The tiles were quite dirty and in need of a deep clean so a 50/50 mix of Tile Doctor Pro-Clean and NanoTech UltraClean was diluted with water and left to soak into the tiles for around 15 minutes before being scrubbed into the Victorian tile and grout using a slow speed rotary machine fitted with a scrubbing pad. The dirty solution was removed and the process repeated and grout lines scrubbed until I was happy the tiles were clean; this was then followed with a thorough rinse with water and a wet vacuum was used to remove the fluids and get the tile and grout as dry as possible. We have a special fan to accelerate the drying process so this switched on and moved around the floor until it was dry.

Victorian Tiles in Coundon cleaned and drying

Sealing Victorian floor tiles

Once the floor was dry we started to seal it using Tile Doctor High Shine sealer which provides stain protection as well as a very shiny finish, hopefully you can appreciate the difference in the photographs on this page.

Victorian Tiles in Coundon Cleaned and Sealed
 

Victorian tiled floor cleaned and sealed near Coventry

Victorian Floor Cleaned and Repaired in Coundon Read More »

Victorian Floor Tiles After Restoration in Stratford upon Avon

Victorian Floor Tile Restoration in Stratford-Upon-Avon

I made another visit back to the historic and famous town of Stratford-upon-Avon recently this time to restore a Victorian Tiled Hallway which had been covered In self levelling cement (don’t ask) which was proving very difficult to remove and I doubt William Shakespeare would of approved.

Victorian Floor Tiles Before Restoration in Stratford upon Avon Victorian Floor Tiles Before Restoration in Stratford upon Avon

Removing Cement from Victorian Tiles

None of the usual methods for removing cement from tile was proving to be effective against this stuff, it was simply too thick so it was necessary to resort to a set off milling disks which grind the surface, I could only go so close to the tile with these however and had to resort to a hand scrapper to remove much of the rest and as you can imagine this took a long time to complete and was quite exhausting work.

Victorian Floor Tiles During Restoration in Stratford upon Avon
The resultant powder was swept and vacuumed from the tile before applying Tile Doctor Grout Clean-Up which we normally use for removing grout smears, it’s an acidic product that you allow to dwell on the tile for a few minutes and then agitate with a scrubbing pad and then remove shortly afterwards using a wet vacuum and then quickly washing the floor down quickly to ensure the acid is removed.

The next job was to give the floor a deep clean using Tile Doctor Pro-Clean mixed 50/50 with NanoTech UltraClean which was worked into the pores of the Victorian tile and grout using a slow speed rotary machine fitted with a scrubbing pad. The dirty solution was removed and the floor rinsed thoroughly with water, again we used the wet vacuum to remove the water and get the tile as dry as possible.

Sealing Victorian floor tiles

I left the floor overnight to dry overnight leaving an air blower to accelerate the drying time and then came back next day to seal the floor; I used a damp test meter first to verify the floor was dry and ready for sealing. Once happy I proceed to apply four coats of Tile Doctor Seal and Go which is an ideal sealer for Victorian Tiles as it leaves a nice shine on the floor as well as providing great stain protection.

Victorian Floor Tiles After Restoration in Stratford upon Avon Victorian Floor Tiles After Restoration in Stratford upon Avon


It was an exhausting job and quite a transformation, unfortunately there were a few area’s I could do nothing about but it all adds to the character of the floor.

Victorian tiled floor restored in Warwickshire

Victorian Floor Tile Restoration in Stratford-Upon-Avon Read More »

Vinyl floor in Wyken after cleaning

Deep cleaning a Vinyl floor at a church in Wyken, Coventry

The great thing about being in the floor cleaning business is that the equipment we use are very flexible and allow the cleaning of many surfaces from Tile, Stone, Grout and Carpet through to in this case a Vinyl floor at Church in Wyken.

Vinyl floor in Wyken before cleaning Vinyl floor in Wyken before cleaning

Cleaning Vinyl Flooring

You can see from the photograph that although the floor was in good physical condition it was dirty and in need of a really deep clean. To do this the floor was mechanically scrubbed using a rotary machine fitted with a scrubbing pad and a solution of Tile Doctor Pro-Clean which is a very flexible heavy duty cleaning product primarily designed for Tile, Stone and Grout but equally effective on Vinyl floors as well. The soiled cleaning solution was then washed away with water which was removed using a wet vacuum and left to dry.

Vinyl floor in Wyken during cleaning Vinyl floor in Wyken during cleaning

Sealing Vinyl

Once the floor was dry three coats of Tile Doctor Seal and Go were applied to the surface which restored the shine finish. You have to wait for a coat to dry before applying the next so this process can take a while to complete.

Vinyl floor in Wyken after cleaning Vinyl floor in Wyken after cleaning


Dirty Vinyl floor cleaned and sealed at a church in Coventry

Deep cleaning a Vinyl floor at a church in Wyken, Coventry Read More »

Quarry Tiled Floor in Long itchington After Cleaning and Sealing

Cleaning Painted Quarry Tiles in Long Itchington

Details below of a Quarry tiled floor that we treated in Long Itchington which had previously been painted with an epoxy paint designed for garage floors. Not the best product for maintaining the natural look of Quarry Tiles.

Quarry-Tiled-Floor-in-Long itchington-Before-Cleaning

Cleaning Quarry Tiles

To get the paint off the floor had to be soaked in a dilution of Tile Doctor Remove and Go which is a coatings remove and can pretty much remove anything from tiles. This was left to work on the tile before being scrubbed in using a rotary machine fitted with a black scrubbing pad. The grout also needed attention and this was also scrubbed this time by hand using a stiff brush along the grout line and more https://www.tiledoctor.co.uk/shop/item.aspx/tile-doctor-remove-go-1-litre/17/. The resultant soiled solution was removed using a wet vacuum and the floor washed down.

There were some stubborn stains so further work continued this time using Tile Doctor Grout Clean-up which is a stronger acid based product ideal for removing grout smears from tile, paint and even rust. Following this the solution was removed as before and the tiles given a thorough rinse to ensure no products were left on the floor and then left to dry overnight.

Quarry-Tiled-Floor-in-Long itchington-Before-and-after-Cleaning

Sealing Quarry Tiles

The floor had dried when we returned the next day so we set about sealing it using three coats of Tile Doctor Colour Grow which provides surface stain protection to the quarry tile and grout and also has a special formula that brings out the colour in the tile.

Quarry-Tiled-Floor-in-Long itchington-After-Cleaning-and-Sealing
 

Cleaning a Quarry Tiled Kitchen Floor in Long Itchington

Cleaning Painted Quarry Tiles in Long Itchington Read More »

Limestone Tiled Floor After Cleaning and Polishing

Resolving a Dull and Scratched Limestone Tiled Floor

This Limestone Tiled Floor was installed in the hall and kitchen of a residence in Coventry. The floor had scratch damage in the middle of the kitchen and was dull from the previous use of the wrong cleaning products, the house had recently been sold and the new owners wanted the damage removed and Limestone sealed and polished so it looked new again.

Limstone Tiled Floor Before cleaning Limstone Tiled Floor showing scratch

Cleaning Limestone and Grout

The first task was to give the floor a general clean using a dilution Tile Doctor Pro-Clean with the focus on the ensuring the grout lines were given a good scrub to get them looking clean again. The dirty solution was then removed from the floor using a wet vacuum and rinsed with clean water.

Limestone like Marble and Granite is a very hard stone and needs to be cutback with burnishing pads to get it looking good again; the pads fit a rotary buffing machine and applied with a little water. Tile Doctor supplies a four pad Burnishing set for this purpose and you start off using a coarse pad to cut back the dirt from the floor and then move through the pads until you get to the last one which is very fine and polishes up the stone.

Limstone Tiled Floor Burnishing Pad

Sealing Limestone Floor Tiles

To protect the floor it was sealed with two coats of Tile Doctor Colour Grow which is designed to lift the natural colours in the stone and will protect the tile from stains in future.

Limstone Tiled Floor After Cleaning and Polishing3 Limstone Tiled Floor After Cleaning and Polishing

In total the floor took eight hours to clean and re-polish, the scratch was gone and the floor now looks new again, just what the customer wanted.

Limestone Tiles Cleaned and Polished in Coventry

Resolving a Dull and Scratched Limestone Tiled Floor Read More »

Slate Tiles After Cleaning in Broadwell

Milled Slate Tiled Floor Cleaned and Sealed in Broadwell

These mixed milled slate floor tiles were installed in the Kitchen, Hall and toilet of a house in Broadwell, Warwickshire. The Slate was staining easily from drink spills and proving hard to clean; on top of that all the tiles were covered in a slight grout haze and had not been sealed or cleaned properly after installation. The customer needed the floor to be easy to clean and manage and was keen to bring out the rich colour and texture of the floor but keep a matt finish.

Slate Tiles Before Cleaning in Broadwell1 Slate Tiles Before Cleaning in Broadwell2

Cleaning black slate floor tiles

The first job was to give the floor a deep clean using Tile Doctor Pro-Clean which was worked into the pores of the Slate tile and grout using a slow speed rotary machine fitted with a scrubbing pad. I then used a wet vacuum to remove the resultant soiled solution and rinsed the floor down with water.

Removing Grout Haze from Slate

The next step was to tackle the grout haze which was evident across the tiles; for this we used Tile Doctor Grout Clean-Up which is an acidic product that you allow to dwell on the tile for a one to two minutes and then agitate with a scrubbing pad and then remove shortly afterwards with a wet vacuum washing the floor down quickly to ensure the acid is removed.

Further cleaning was required to some areas which had proven stubborn to clean earlier and for this we used Pro-Clean again mixed 50/50 with NanoTech UltraClean which adds tiny abrasive particles to make a more effective cleaning product; again this was scrubbed in and then once we were happy with the result the floor was washed down with clean water in order to neutralise it before sealing.

Sealing Slate floor tiles

I left the floor overnight to dry then came back next day and used a damp test meter to verify the floor was dry and ready for sealing. Once happy I proceed to apply four coats of Tile Doctor Colour Grow which matched their requirements in a sealer exactly as it provides a matt finish brings out the colour in the stone and offers great stain protection.

Slate Tiles After Cleaning in Broadwell1 Slate Tiles After Cleaning in Broadwell5


Slate tiled floor cleaned and sealed in Warwickshire

Milled Slate Tiled Floor Cleaned and Sealed in Broadwell Read More »

Limestone Kitchen Part Sealed

Resolving installation issues with a black Limestone tiled floor

This client had recently had a black limestone tiled floor installed in the kitchen and dining area in his home on the northern border of Warwickshire. Unfortunately however the tiler had not sealed the tiles prior and struggled to remove the grout smears from the Limestone surface. The tiles were then sealed trapping the grout haze under the sealer; naturally the client was far from happy and was instructed to remove the grout using an acid wash.

Black Limestone Tiles Before Black Limestone Tiles Before

The acid things turned the floor grey removing the oils in the floor from the factory and also caused the natural salts within the tile to rise to the surface. The tiles were then sealed with an external patio sealant without removing the existing surface sealer. All this compounded the problems in the floor causing it to mark easily and lose its colour; on top of that it had big cloudy white patches all over from the trapped salts.

Stripping sealer from a Limestone Floor Tiles

To resolve the problems with the floor it had to be fully stripped back and cleaned of all sealants and salt etc. which was done by applying a solution of Tile Doctor Remove and Go combined with Nanotech UltraClean mopped on to the floor in two square metres at a time. The solution was allowed to soak into the floor for thirty minutes to allow the chemicals break down and then scrubbed using a rotary machine fitted with a black pad. The soiled solution was then extracted from the floor using a wet vacuum. This process was repeated across the entire floor until all the sealer had been removed.

Limestone Kitchen Floor After Cleaning

Removing Salts from Limestone Tiles

To remove the salts and remaining grout haze the floor was treated with Grout Clean-up which is an acid based cleaning product that is designed to penetrate below the surface and remove light grout smears (grout haze) as well as mineral deposits such as salts and efflorescence, again this treatment was applied two square meters at a time, quickly worked into the floor and removed with the wet vacuum. Once this process was complete the whole floor was washed at high pressure rinse three times to ensure all trace of chemicals had been removed.

The floor was left to dry and when we came back the second day it was noticed that there were still some salts coming through to the surface of the Limestone, these areas were re-treated and the floor washed down again and left to dry as before.

Limestone Kitchen Part Sealed

Sealing Limestone Floor Tiles

The floor looked much improved on the third day although it was still looking washed out. To put the colour back into the black limestone it was treated with stone oil with turns the floor back to black and then sealed with two coats of Tile Doctor Colour Grow which will protect the tile going forward.

The floor now looks how it was intended and certainly the customer was pleased and left the following comment on our feedback system.

“We are so pleased with the work carried out by the tile doctor to our kitchen, utility and family room. The floor now looks exactly how we hoped it would look when we originally purchased it. We’ve struggled to get it looking right since then and now we feel we finally have a floor we can enjoy at last! We also found Mick to be professional and highly knowledgeable on our floor. He has given us really good advice and has been really easy to contact and has also been happy to give us further help and advice over the phone even when the job’s been completed. L. Nash”

Limestone Kitchen Floor After Cleaning and Sealing Limestone Kitchen Floor After Cleaning and Sealing

Limestone installation problems resolved in Warwickshire

Resolving installation issues with a black Limestone tiled floor Read More »

Scroll to Top