Sealing

Quarry Tiled Floor After Restoration in Stratford-upon-Avon

Quarry Tiled Floor Restored in Stratford upon Avon

Located in the hallway of an old vicarage in the historic town of Stratford upon Avon these Quarry tiles had been hidden under carpet for many years and before that it appears had been painted in red brick paint and splattered with plaster and paint from decorating. I was asked if there was anything we could do to restore them and having done a number of these types of renovations before I was confident that would could and got the go ahead to proceed.

Quarry Tiled Floor Before Restoration in Stratford-upon-Avon Quarry Tiled Floor Before Restoration in Stratford-upon-Avon

Restoring a Quarry tiled floor

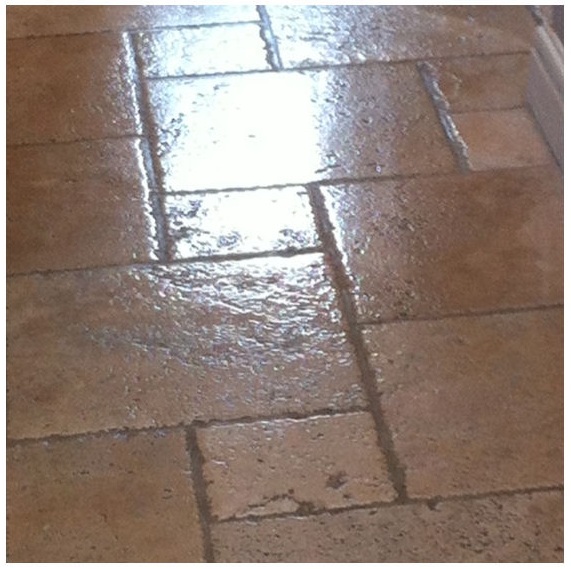
The first job was to give the floor a really good deep clean and to remove any coatings from the tiles. To do this a strong dilution of Tile Doctor Remove and Go was left to soak into the floor for about 30 minutes before being scrubbed in using a slow speed rotary machine fitted with a scrubbing pad. I then used a wet vacuum to remove the resultant soiled solution and rinsed the floor down with water. There were quite a few stubborn areas and so the whole process had to be repeated, additionally some of the paint needed to carefully removed using a scraper.

Once the floor was clean I gave it a wash with Tile Doctor Grout Clean-up which is an acid based product that will remove light grout smears and mineral deposits from effloresce which can leave to white salt deposits appearing on the tile surface and can be quite common on old tiled floors that have no damp proof course.

The cleaning process took up the whole day and after finishing the whole floor was given a thorough rinse with water to ensure no trace of cleaning product remained on the floor.

Sealing a Quarry tiled floor

I left the floor overnight to dry then came back next day and used a damp test meter to verify the floor was dry and ready for sealing. Once happy I proceed to apply four coats of Tile Doctor Colour Grow which matched their requirements in a sealer exactly as it provides a matt finish brings out the colour in the stone and offers great stain protection.

Quarry Tiled Floor After Restoration in Stratford-upon-Avon Quarry Tiled Floor After Restoration in Stratford-upon-Avon


Quarry tiles tiled floor restored in Warwickshire

Quarry Tiled Floor Restored in Stratford upon Avon Read More »

Limestone Tiled Floor After Cleaning and Polishing

Resolving a Dull and Scratched Limestone Tiled Floor

This Limestone Tiled Floor was installed in the hall and kitchen of a residence in Coventry. The floor had scratch damage in the middle of the kitchen and was dull from the previous use of the wrong cleaning products, the house had recently been sold and the new owners wanted the damage removed and Limestone sealed and polished so it looked new again.

Limstone Tiled Floor Before cleaning Limstone Tiled Floor showing scratch

Cleaning Limestone and Grout

The first task was to give the floor a general clean using a dilution Tile Doctor Pro-Clean with the focus on the ensuring the grout lines were given a good scrub to get them looking clean again. The dirty solution was then removed from the floor using a wet vacuum and rinsed with clean water.

Limestone like Marble and Granite is a very hard stone and needs to be cutback with burnishing pads to get it looking good again; the pads fit a rotary buffing machine and applied with a little water. Tile Doctor supplies a four pad Burnishing set for this purpose and you start off using a coarse pad to cut back the dirt from the floor and then move through the pads until you get to the last one which is very fine and polishes up the stone.

Limstone Tiled Floor Burnishing Pad

Sealing Limestone Floor Tiles

To protect the floor it was sealed with two coats of Tile Doctor Colour Grow which is designed to lift the natural colours in the stone and will protect the tile from stains in future.

Limstone Tiled Floor After Cleaning and Polishing3 Limstone Tiled Floor After Cleaning and Polishing

In total the floor took eight hours to clean and re-polish, the scratch was gone and the floor now looks new again, just what the customer wanted.

Limestone Tiles Cleaned and Polished in Coventry

Resolving a Dull and Scratched Limestone Tiled Floor Read More »

Sandstone Flagstones After Sealing

Sealing Sandstone Flagstones in Stretton under Fosse

These Sandstone flagstones were in the hallway of a house in the 16th century village of Stretton under Fosse, Warwickshire. The flagstone floor was in good condition however it had never been sealed so every time it was cleaned the cleaning product soaked into the floor and was less effective also the customer wanted to reveal the natural colours in the Sandstone and needed some of the grout repairing.

Cleaning Sandstone Flagstones

The first job was to clean and flush the flagstone so we set about cleaning the stone using Tile Doctor Pro-Clean mixed 50/50 with NanoTech Ultra-Clean and further diluted with water. I often use this combination, Pro-Clean is a strong and effective alkaline cleaner whilst NantoTech adds tiny abrasive particles that assist and speed up the cleaning process.

Sandstone Flagstone Cleaning
The solution was applied using a mop and then worked into the floor using a rotary buffing machine fitted with a black 17” scrubbing pad. The soiled cleaning solution was then picked up off the floor using a wet and dry vacuum and the floor was given a thorough wash down with clean water to remove a trace of cleaning products that may impact the sealer. There were a few areas of grout that had cracked and become lose so we set about replacing the grout with a closer match as possible and then left for the day to allow the floor to try overnight.

Sandstone Flagstones Before Sealing Sandstone Flagstones Before Sealing Close-Up

Sealing the Flagstone Floor

We sealed the Sandstone flagstones with a single coat of Tile Doctor Colour Grow, there are a number of sealers we could of used for this floor all have different effects and differing levels of stain protection against spills but Colour Grow is really durable and helps to bring out the deep colour from within the stone . To finish and build up the lustre and richness of the colour we then applied seven coats of Seal & Go which add a nice low sheen to the surface of the tile.

Sandstone Flagstones After Sealing Sandstone Flagstones After Sealing Close-Up


Cleaning and Sealing Sandstone Flags in Stretton under Fosse

Sealing Sandstone Flagstones in Stretton under Fosse Read More »

Paxford Terracotta Floor after sealing

Matching mixed Terracotta Kitchen tiles in Paxford

This job was a Terracotta Tiled kitchen floor in Paxford near Chipping Camden, the Terracotta tiles were in a large kitchen/diner which had a mix of different types of Terracotta due to the replacement of some damaged tiles. The recently fitted tiles were slightly darker than the older tiles in the kitchen area and the customer wanted a closer match but at the same time didn’t want the floor looking new (with all the wax and oil removed) just the old tiles made darker. You can clearly see the problem in the first photograph below.

Paxford Terracotta Floor Before

Cleaning Terracotta Tiles

The floor had a heavy build of a wax and oil coatings which we tackled with a Tile Doctor Pro-Clean mixed with two parts NanoTech Ultra-Clean; this combines the strong cleaning power of the alkaline Pro-Clean with the nano sized abrasive particles in the Ultra-Clean to make a powerful cleaning agent. We left the solution to dwell and soak into the tiles for twenty minutes before working it in with a heavy floor buffing machine fitted with a black scrubbing pad, some areas had experienced little foot traffic and so had a thicker coating needed up to three cleans. All the edges were done by hand using wire wool pads and brushes. The soiled water was picked up by a wet and dry vacuum and then the floor was thoroughly rinsed with water using a high pressure spinning tool.

Paxford Terracotta Floor after cleaning

Terracotta Tile Sealing

We let the floor dry overnight and returned the next day to seal it for which we used a combination of Tile Doctor sealers. The first step was to darken some of the lighter tiles so they would match the others in the dining room we did this using a sealer called Colour Grow which brings out the colour in a Tile. Once we were happy with this floor was fully sealed using five coats of Tile Doctors new formula High Shine sealer to give a uniform look.

Paxford Terracotta Floor after sealing
 

Replacement Terracotta tiles sealed to match existing floor

Matching mixed Terracotta Kitchen tiles in Paxford Read More »

Terracotta Floor After

Removing Linseed Oil from Terracotta in Leamington Spa

This Terracotta floor in Leamington Spa had been sealed previously with Linseed Oil; apparently the tiler had dipped the Tile into the oil to make sure he had an even coverage. Linseed Oil is a traditional way of sealing terracotta however it makes the tiles significantly darker and over the years it becomes increasingly difficult to maintain.

Terracotta Floor Before Terracotta Floor Before

Cleaning Terracotta Tiles

To remove the oil and clean the floor we used a 50/50 mix of Pro-Clean and NanoTech Ultra-Clean, the strong cleaning power of the alkaline Pro-Clean mixed with the tiny abrasive particles in the Ultra-Clean combine together to make a powerful cleaning agent. We left the solution to dwell and soak into the tile for twenty minutes giving it time to break down the oil before working it in with a rotary buffing machine fitted with a black scrubbing pad. We then scrubbed and cleaned the grout lines by hand using stiff grout brushes and picked up the soiled cleaning solution using a wet vacuum. Last step was to rinse the floor down to remove any remaining chemical and effectively neutralise the floor before sealing; to do this we used a high pressure spinner tool which is an industrial system fitted into our van that delivers high pressure hot water to a lance whilst simultaneously removing the resulting water with a secondary suction action.

Terracotta Tile Sealing

We let the floor dry overnight and returned the next day only to notice that in a number of places linseed oil had dried on the surface to form some oil spots. These had to be removed before we began the sealing process so the spots were treated with a strong sealer remover product called Remove and Go and the floor was re-cleaned using an industrial steam vacuum.

We left the floor to dry again overnight and came back the third day to seal it, this time I’m pleased to say the floor was clear of the Linseed Oil and so we began to seal it using Tile Doctor Colour Grow which is a breathable colour intensifying sealer which brings out the natural colours in the tile surface as well as providing durable stain protection; Four coats were sufficient to seal the floor, it is a time consuming task however as you need to make sure the sealer has dried before applying the next coat.

Terracotta Floor After Terracotta Floor After

This job had taken three days and I had only quoted for two however we stuck to our original quote and only charged for the two days.

Terracotta Tiles Cleaned of Linseed Oil and Resealed

Removing Linseed Oil from Terracotta in Leamington Spa Read More »

Quarry Tile Floor After Restoration

Removing Tar from Quarry Tiles in Rugby

This Quarry Tiled floor was in a house in the village of Clifton-upon-Dunsmore which is close to Rugby; the tiles had been covered in an unattractive damp proof tar membrane and then hidden under carpet for many years and the owner wanted the floor restoring.

Quarry Tile Before showing tar on floor Quarry Tile Before showing tar on floor

Quarry Tile Tar Removal

To remove the tar membrane the Quarry Tiled floor was coated with Tile Doctor Remove and Go mixed 50/50 with NanoTech Ultra-Clean and left to dwell for 30 minutes to an hour. We then scrubbed the floor using a rotary machine fitted with a black scrubbing pad, the combined effect of the chemicals and scrubbing action broke down the tar and loosened it from the surface of the tile and was then removed with water and a wet Vacuum. It took a whole day to complete the floor as it was necessary to remove the tar in 2 metre square sections.

Quarry Tile Tar Removal in progress
The following day the floor was washed down with Tile Doctor Grout Clean-Up which is an Acid based product ideal for removing the salt in the floor, all the edges were done by hand with a tar remover solvent and steel wire wool then washed down again 4 times with cold water before being rinsed with a high pressure spinner tool.

The last step was to use a warm air dryer to speed dry the floor before it was sealed. For this we used two coats of Tile Doctor Colour Grow which is a breathable sealer that will provide durable stain protection as well as allowing vapour transmission a necessary feature for old floors with no damp proof course.

Quarry Tile Floor After Restoration Quarry Tile Floor After Restoration


Quarry Tile Restoration in Rugby

Removing Tar from Quarry Tiles in Rugby Read More »

Quarry Tile After Restoration

Kitchen Quarry Tile Restoration in Coundon, Coventry

These Quarry tiles were in the kitchen of a house in Coundon, Coventry; the owner of the house found them hidden under a carpet and was keen to restore them. You can see from the photograph below they had been seriously neglected, covered in paint and cement and then finally carpet adhesive.

Restoring Quarry Tiles

First the quarry tiled floor was dry vacuumed to remove loose soil and particles from the surface. It was then cleaned using Tile Doctor Grout Clean-Up which is an acid based product useful for the removal of grout from the surface of the tile and in this case cement. The solution was worked into the tile using a buffing machine fitted with a black scrubbing pad. The soiled solution was removed using a wet vacuum and then rinsed with water; the process had to be repeated a second time before we were happy with the result.

Quarry-Tile-Before-Restoration
The next step in the cleaning process was to use a powerful industrial steam cleaner on the surface of the quarry tiles, as well as cleaning the steam had the added advantage of neutralising the floor before sealing.

Quarry Tile Sealing

The floor was now clean and the hot steam soon evaporated so it wasn’t long before we set about sealing the Quarry Tiles with four coats for Tile Doctor Seal and Go which combines stain resistance with a durable low-sheen finish.

Quarry-Tile-After-Restoration
Quarry Tiles after Restoration

Quarry Tiled Kitchen Floor Restored in Counden, Coventry

Kitchen Quarry Tile Restoration in Coundon, Coventry Read More »

Slate Hallway After Cleaning and Sealing

Removing Grout Haze from Slate Tile Flooring

You may remember a previous Limestone floor job we did for a Mrs Schwartz from Stourbridge, well true to her word she invited us back to clean and seal the slate tile flooring in her hallway which had been left with grout smears (aka grout haze) on the surface after tiling. Grout smears can be removed however if the floor is sealed it’s necessary to remove the sealer first.

Slate Hallway Before Cleaning

Cleaning Grout Haze off Slate Tile Flooring

To remove the sealer and clean off the grout smears we used a 50/50 mix of Tile Doctor Remove and Go combined with Nanotech Ultra-Clean for added effect, the solution was left to dwell on the surface of the slate for 15 minutes to break down the polymers in the grout. The next step was to turn on a high pressure spinner tool which is a very effective cleaning tool on its own; the water from the spinner tool also washes away any chemicals and neutralises the floor ready for sealing.

Slate Hallway Before Cleaning

Sealing Slate Tiles

We speed dried the slate tile flooring using a number of industrial fans and applied three coats of Tile Doctor Seal and Go which offers a good combination of stain resistance with a low sheen finish that brings out the natural colours in the slate.

Slate Hallway After Cleaning and Sealing Slate Hallway After Cleaning and Sealing


Cleaning and Sealing Slate Tile Flooring in Stourbridge

Removing Grout Haze from Slate Tile Flooring Read More »

Limestone Floor After Polish and Seal

Removing Marks from a Limestone Tiled Floor in Stourbridge

We often get called to sort out problems left behind by Tilers and this case was no exception. This Limestone tiled floor in the kitchen of a house in the historic town of Stourbridge had been sealed using a cloth and resulted in visible wipe marks being left behind in the top surface seal.

Removing the Sealer from Limestone Tiles

To resolve we had to cut back the surface using a set of twister burnishing pads, these diamond encrusted pads come in a number of different colours each one does a different job from scrubbing to polishing.

Limestone Floor Before Polishing Limestone Floor Before Burnishing

Polishing and Sealing the Limestone Floor

The next step was to re-seal the floor which was done using one coat of Tile Doctor Colour Grow which really brings out the colour in a stone floor. This was followed by the application of Tile Doctor Shine Powder which is a crystallising powder that leaves a very high shine and tough durable finish.

Limestone Floor After Polishing Limestone Floor After Polish and Seal

The job took a whole day to complete and the owner was so pleased with the results she left the following comments:

Mick was very professional and so enthusiastic about his work. He was genuinely determined to the very best job and has transformed our dull lifeless limestone floor. We are delighted with the results. Nothing was too much trouble for him and he went beyond our expectations. I have booked him in for next week to clean our slate hall floor. Excellent!

Mrs Schwartz, Stourbridge


Limestone Tiled Floor Restoration in Stourbridge

Removing Marks from a Limestone Tiled Floor in Stourbridge Read More »

Travertine Tiles After Cleaning

Cleaning Travertine in Stratford-upon-Avon

Travertine Cleaning in Stratford

We started the cleaning of a travertine floor in Stratford (that’s Stratford-upon-Avon in Warwickshire not East London where the 2012 Olympics are being held) using Pro-Clean diluted with water and a floor buffer fitted with a Scrubbing Pad and Grout Brush. For best results it’s best to leave the cleaning solution to dwell on the Travertine floor for five minutes before agitating and scrubbing, this allows the cleaner to penetrate the tile better and lift the dirt out of the floor.

Travertine Floor in Stratford-upon-avon Before Cleaning Travertine Floor Before Cleaning by Tile Doctor Warwickshire
Travertine Floor Before Cleaning

Travertine Floor Cleaning

The floor was rinsed down with clean water and the use of a high pressure floor spinner tool, before being cut back with a set of Twister burnishing pads finishing on the yellow polishing pad.

Travertine Tiles Before Cleaning Travertine Tiles in Warwickshire After Cleaning
Travertine Floor After Cleaning and Sealing

Travertine Floor Sealing

After the Travetine Cleaning the floor was left to dry before sealing with Tile Doctor Colour Grow, we then applied the last Green burnishing pad in the set to lock in the seal and remove any excess sealer from the surface of the tile. The last step was to use Tile Doctor Shine to give leave a durable high shine on the floor. The floor took a full day to clean, seal and re-polish.

The Customer, Mrs Gough was very pleased with the results and left the following comment on the Tile Doctor website:
Mick is a true professional who totally puts you at ease. It was a lot of money for me as I chose the most expensive package but worth every penny.

Travertine Tiled Floor Restoration in Stratford

Cleaning Travertine in Stratford-upon-Avon Read More »

Victorian Floor After Restoration

Victorian Tiled Floor in Erdington Birmingham

Victorian Floor in Erdington Birmingham

Details below of a Victorian Floor Resotration job in Erdington. The floor was soiled with dirt and paint spots and the owner wanted it restored back to its original beauty and preserved for the future.

Victorian Floor Before Restoration Victorian Floor Before Restoration
Victorian Tiled Floor Before Restoration

Cleaning the Victorian Tiled Floor

We used Pro-Clean mixed 50/50 with NanoTech Ultra Clean and hot water mopped on to the floor and left for 20mins to soak to help release the dirt. This was followed by scrubbing with a heavy floor buffer fitted with a black pad; we used a wet vacuum to pick up the solution from the floor and then rinsed with clean water and then steam vacuumed and speed dried with a fan blower.

Victorian Floor After Restoration
Victorian Tiled Floor After Restoration

Sealing the Victorian Tiled Floor

When dry the floor was sealed with 2 coats of Tile Doctor Colour Grow to bring out colour then one coat of Tile Doctor Seal and Go to add a shine. The jobs took two days in total, the photographs don’t really do the floor justice but the difference was remarkable.

Victorian Floor Restoration in Erdington Birmingham

Victorian Tiled Floor in Erdington Birmingham Read More »

Victorian Tile Floor Cleaned and Sealed

Church Floor Cleaned and Sealed

Victorian Tile Floor Cleaning

Pictures below from St Gregory’s Church located in the village of Offchurch Warwickshire. The Victorian floor was laid in the 1800’s, there were signs of damage from acid based cleaning and high foot traffic in the central areas, no doubt from years of use from the parishioners.

Victorian Church Floor before tile cleaning
Victorian Church Floor before Tile Cleaning

Tile Cleaning

We used Pro-Clean (diluted 1 to 5 with water) applied with a mop to the floor area then using a floor buffing machine fitted with a nylon scrub brush we proceeded to agitate the solution whilst scrubbing the floor in order to break down the soil.

The dirty solution was then vacuumed off the floor using a wet and dry vac machine followed by rinsing with clean water at low pressure to remove any left over soil and product.

Victorian Floor Tile Sealing

Victorian Tiled Church Floor after Tile Cleaning and Sealing

The next day the floor had small areas still drying which was speed dried using fans and hot air. We then sealed the floor using three to five coats of Seal and Go depending on the area.

Victorian Tile Floor Cleaned and Sealed
Victorian Tile Floor Restored

Victorian Tiled Floor cleaning by Tile Doctor Warwickshire.

Church Floor Cleaned and Sealed Read More »

Slate Floor After Tile Cleaning and Sealing

Triumph Club Slate Tile Cleaning and Sealing

Slate Tile Cleaning and Sealing at the Triumph Working men’s club

It’s often difficult for a set of photographs to capture the difference cleaning and sealing a stone floor can make, however I think you will agree the photographs below which were taken at the Standard Triumph working men’s club in Coventry show an amazing transformation.

The slate floor had one coat of sealer put down by the tiler some ten years ago and due to the nature of the environment it had been covered in drink spills and the resulting cleaning products, overtime this had made floor sticky and dull.

Slate Floor before Tile Cleaning
Slate Floor before Tile CleaningSlate Floor Before Tile Cleaning  

Slate Tile Cleaning Process

The first step in the Slate Tile Cleaning process was to get it completely clean and free of any residual chemicals, we did this with the application of Tile Doctor Pro-Clean (a strong 1/2 mix with water) which we left to dwell for 15 to 20 minutes allowing it to chemically soak into pores of the slate tile. We then scrubbed the floor with a heavy weight floor buffer allowing the scrubbing action to break the soil down, we worked the soil and grout lines four square metres at a time, removing the soiled water with a wet and dry vacuum. The slate floor was then washed down with cold water applied at a pressure or 1200 psi with a special Spinner Tool. The whole tile cleaning process took around 8 hours to complete.

An inspection of the cleaned slate floor revealed ten years of wear and tear had resulted in a few holes which we repaired before leaving the floor to fully dry overnight.

Slate Floor After Tile Cleaning and Sealing
Slate Floor after Tile Cleaning and Sealing 

Sealing the Slate Tile

The next day we coated the floor with 5 coats of a Tile Doctor Seal and Go which is a water based sealer ideal for Slate floors that provides stain resistance and a durable low-sheen finish. Sealers do break down over time and given the high foot traffic over this floor we have agreed to go back once a year to provide a tile cleaning and sealer top up.

Triumph Club Slate Tile Cleaning and Sealing Read More »

Limestone Floor After Restoration

Limestone Floor Restoration

Limestone Floor Restoration

Some photographs below of a Limestone floor in a property in the West Midlands. The property had just been sold and the new owners wanted the Limestone floor, which was heavy damaged from pets and the application of the wrong cleaning products, restored back to its original condition. Owners of stone floors really need to take care not to use acidic products to clean their floors as this slowly eats away at the stone; you get the same problem from pet urine which contains Uric acid.

Limestone floor before restoration by Tile Doctor Warwickshire
Limestone floor before restoration

I cleaned the floor using Tile Doctor Pro-Clean along with the diamond coated burnishing pad system and then sealed with Tile Doctor Colour Grow which is great for bringing out the colours in stone.

Limestone Floor After Restoration

After sealing we polished the floor with Tile Doctor Shine which is a crystallising powder that provides a very high deep shine and tough durable finish.

Limestone Kitchen Floor After Restoration

All in the entire Limestone Floor restoration took two long 12 hour days however our efforts were rewarded by the look on the faces of the new owners who were over the moon with the finished job.

Limestone Floor Restoration Read More »

Scroll to Top