Restoration

Quarry Tiled Floor Thatched Cottage in Rugby Before and After

Ex Pub Quarry Tiled Floor Restored to Fantastic Condition in Newbold-on-Avon, Rugby

Pubs have been though a decline in the last ten years with one in five closing due to increased business rates and some believe the ban on smoking has had a part to play. My client saw this particular pub come up for sale in Newbold-on-Avon near Rugby and snapped it up with the intention of turning the lovely thatched Cottage back into a home. It needed a lot of work though and I was called into to sort out the floor which was a mixture of 6×6 inch and 9×9 inch Quarry tiles. The tiles were in a bit of a state and there were also large sections of concrete in 3 areas that had been painted red to blend in with the tiles.

Quarry Tiled Floor Thatched Cottage in Rugby Before Quarry Tiled Floor Thatched Cottage in Rugby Before

Rebuilding and Cleaning a Quarry Tiled Floor

The customer wanted the Quarry tiled floor restoring and extended throughout the floor which meant a substantial amount of work would be required to remove the concrete, rebuild the foundation and level with screed and then fit around 100 reclaimed tiles not to mention cleaning and sealing.

Quarry Tiled Floor Thatched Cottage in Rugby During Rebuild Quarry Tiled Floor Thatched Cottage in Rugby During Rebuild

The work was hard going at times, especially knocking out the concrete and adding the screed surface to the right level. Once that was done worked moved quickly on to laying the new tiles and grouting them in. Overall it took three days just to rebuild the floor alone.

Quarry Tiled Floor Thatched Cottage in Rugby During Rebuild Quarry Tiled Floor Thatched Cottage in Rugby During Rebuild

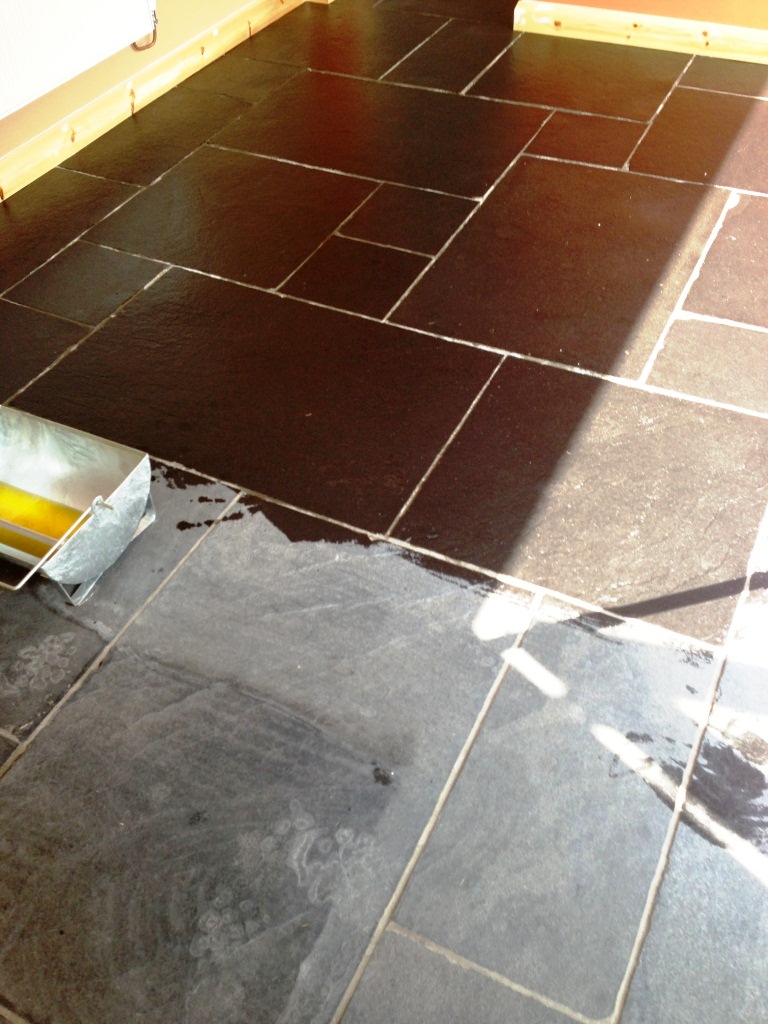
The customer did not what the Floor to look too different between the old and new so once the tiling was done the whole floor was treated with Tile Doctor Remove and Go to remove traces of red paint and glue. The solution was scrubbed in using a rotary machine fitted with a scrubbing pad and then rinsed off with water and then extracted using a wet vacuum.

This improved the look of the tiles but it also revealed some grout haze issues on the original tiles and after digging up the floor earlier I was aware no damp proof course had been installed which is not unusual in these older properties. To counter the grout haze and deal with any potential efflorescence issues I gave the whole floor an acid wash with Tile Doctor Grout Clean-up which was scrubbed in and then rinsed off with water and extracted with a the wet vacuum. The tiles need to be dry in order to be sealed so I left the floor for 24 hours with a number of industrial Air Movers in place to aid the drying process.

Sealing a Quarry Tiled Floor

Upon my return to the house I checked for any dampness that could have damaged the performance of the sealer, thankfully, the floor was dry and ready to seal, and so I proceeded to apply several coats of Tile Doctor Seal & Go Extra.

Seal & Go Extra is a fully breathable sealer that allows for effective moisture transmission, important where no damp proof course is installed. The sealer provides durable surface protection against dirt and stains, and is suitable for most kinds of internal, natural stone tiled floors, including Quarry, Victorian and Flagstone.

Quarry Tiled Floor Thatched Cottage in Rugby After Quarry Tiled Floor Thatched Cottage in Rugby After

The job took a week in total and as you can see from the photographs I successfully managed to restore the old tiles which with the addition of the cleaning and sealing have blended in well with the new tiles.

Quarry Tiled Floor Restoration in Warwickshire

Ex Pub Quarry Tiled Floor Restored to Fantastic Condition in Newbold-on-Avon, Rugby Read More »

Edwardian Tiled Floor Covered In Tar Chaplefields Coventry Before and After Restoration

Beautiful Edwardian Tiled Hallway Repaired and Restored in Chaplefields

The owner of this house in Chaplefields near Coventry had bought this property as an investment and was keen to improve its appearance. As part of this work he had lifted the vinyl tiles in the hallway and discovered a lovely Edwardian tiled floor. Unfortunately, whoever had laid the Vinyl tiles had decided to use Tar as an adhesive and this had left a black mess all over the floor.

Edwardian Tiled Floor Covered In Tar Chaplefields Coventry Before Restoration
Realising the potential value an original feature such as this could add to the property he was keen to restore the tiles but not so keen to deal with the Tar, so we were asked to deal with the problem and restore the floor as close to its original condition as possible.

Repairing and Cleaning a Dirty Edwardian Tiled Floor

To get the tiles clean and remove the horrible tar I applied a strong dilution of Tile Doctor Remove and Go, which as its name suggest is great for removing coverings from tiles. I applied the Remove and Go with a mop, left it to soak in for a few minutes and then worked it in using a rotary machine fitted with a black scrubbing pad. The soil was extracted off the floor using a wet and dry vacuum and then the process repeated until I was happy all the tar was gone.

I then gave the tiles an acid wash using Tile Doctor Acid Gel; this serves to break down alkaline mineral deposits such as cement and grout smears, it also counters any efflorescence problems which can be an issue with these old floors where no damp proof membrane has been installed.

Finally, the floor was given a rinse with clean water and a steam clean to remove any trace of cleaning products and to neutralise the tiles in preparation for sealing.

Sealing a Edwardian Tiled Floor

I left the floor to dry off overnight and returned to the property to seal the tiles the next day. To seal the tiles, I used three coats of Tile Doctor Seal and Go which is a water based sealer that leaves a subtle sheen finish and being water based doesn’t leave a smell as it dries. The sealer will provide durable protection going forward preventing dirt from becoming ingrained into the pores of the tile and ensuring it remains easy to clean and keeping its appearance for some time to come.

Edwardian Tiled Floor Covered In Tar Chaplefields Coventry After Restoration
The floor now looks fantastic and gives a great impression when you come into the property which is exactly what the owner wanted.

Professional Restoration of an Edwardian Tiled Hallway in Warwickshire

Beautiful Edwardian Tiled Hallway Repaired and Restored in Chaplefields Read More »

Vinyl floor in Wyken after cleaning

Deep cleaning a Vinyl floor at a church in Wyken, Coventry

The great thing about being in the floor cleaning business is that the equipment we use are very flexible and allow the cleaning of many surfaces from Tile, Stone, Grout and Carpet through to in this case a Vinyl floor at Church in Wyken.

Vinyl floor in Wyken before cleaning Vinyl floor in Wyken before cleaning

Cleaning Vinyl Flooring

You can see from the photograph that although the floor was in good physical condition it was dirty and in need of a really deep clean. To do this the floor was mechanically scrubbed using a rotary machine fitted with a scrubbing pad and a solution of Tile Doctor Pro-Clean which is a very flexible heavy duty cleaning product primarily designed for Tile, Stone and Grout but equally effective on Vinyl floors as well. The soiled cleaning solution was then washed away with water which was removed using a wet vacuum and left to dry.

Vinyl floor in Wyken during cleaning Vinyl floor in Wyken during cleaning

Sealing Vinyl

Once the floor was dry three coats of Tile Doctor Seal and Go were applied to the surface which restored the shine finish. You have to wait for a coat to dry before applying the next so this process can take a while to complete.

Vinyl floor in Wyken after cleaning Vinyl floor in Wyken after cleaning


Dirty Vinyl floor cleaned and sealed at a church in Coventry

Deep cleaning a Vinyl floor at a church in Wyken, Coventry Read More »

Limestone Kitchen Part Sealed

Resolving installation issues with a black Limestone tiled floor

This client had recently had a black limestone tiled floor installed in the kitchen and dining area in his home on the northern border of Warwickshire. Unfortunately however the tiler had not sealed the tiles prior and struggled to remove the grout smears from the Limestone surface. The tiles were then sealed trapping the grout haze under the sealer; naturally the client was far from happy and was instructed to remove the grout using an acid wash.

Black Limestone Tiles Before Black Limestone Tiles Before

The acid things turned the floor grey removing the oils in the floor from the factory and also caused the natural salts within the tile to rise to the surface. The tiles were then sealed with an external patio sealant without removing the existing surface sealer. All this compounded the problems in the floor causing it to mark easily and lose its colour; on top of that it had big cloudy white patches all over from the trapped salts.

Stripping sealer from a Limestone Floor Tiles

To resolve the problems with the floor it had to be fully stripped back and cleaned of all sealants and salt etc. which was done by applying a solution of Tile Doctor Remove and Go combined with Nanotech UltraClean mopped on to the floor in two square metres at a time. The solution was allowed to soak into the floor for thirty minutes to allow the chemicals break down and then scrubbed using a rotary machine fitted with a black pad. The soiled solution was then extracted from the floor using a wet vacuum. This process was repeated across the entire floor until all the sealer had been removed.

Limestone Kitchen Floor After Cleaning

Removing Salts from Limestone Tiles

To remove the salts and remaining grout haze the floor was treated with Grout Clean-up which is an acid based cleaning product that is designed to penetrate below the surface and remove light grout smears (grout haze) as well as mineral deposits such as salts and efflorescence, again this treatment was applied two square meters at a time, quickly worked into the floor and removed with the wet vacuum. Once this process was complete the whole floor was washed at high pressure rinse three times to ensure all trace of chemicals had been removed.

The floor was left to dry and when we came back the second day it was noticed that there were still some salts coming through to the surface of the Limestone, these areas were re-treated and the floor washed down again and left to dry as before.

Limestone Kitchen Part Sealed

Sealing Limestone Floor Tiles

The floor looked much improved on the third day although it was still looking washed out. To put the colour back into the black limestone it was treated with stone oil with turns the floor back to black and then sealed with two coats of Tile Doctor Colour Grow which will protect the tile going forward.

The floor now looks how it was intended and certainly the customer was pleased and left the following comment on our feedback system.

“We are so pleased with the work carried out by the tile doctor to our kitchen, utility and family room. The floor now looks exactly how we hoped it would look when we originally purchased it. We’ve struggled to get it looking right since then and now we feel we finally have a floor we can enjoy at last! We also found Mick to be professional and highly knowledgeable on our floor. He has given us really good advice and has been really easy to contact and has also been happy to give us further help and advice over the phone even when the job’s been completed. L. Nash”

Limestone Kitchen Floor After Cleaning and Sealing Limestone Kitchen Floor After Cleaning and Sealing

Limestone installation problems resolved in Warwickshire

Resolving installation issues with a black Limestone tiled floor Read More »

Sandstone Flagstones After Sealing

Sealing Sandstone Flagstones in Stretton under Fosse

These Sandstone flagstones were in the hallway of a house in the 16th century village of Stretton under Fosse, Warwickshire. The flagstone floor was in good condition however it had never been sealed so every time it was cleaned the cleaning product soaked into the floor and was less effective also the customer wanted to reveal the natural colours in the Sandstone and needed some of the grout repairing.

Cleaning Sandstone Flagstones

The first job was to clean and flush the flagstone so we set about cleaning the stone using Tile Doctor Pro-Clean mixed 50/50 with NanoTech Ultra-Clean and further diluted with water. I often use this combination, Pro-Clean is a strong and effective alkaline cleaner whilst NantoTech adds tiny abrasive particles that assist and speed up the cleaning process.

Sandstone Flagstone Cleaning
The solution was applied using a mop and then worked into the floor using a rotary buffing machine fitted with a black 17” scrubbing pad. The soiled cleaning solution was then picked up off the floor using a wet and dry vacuum and the floor was given a thorough wash down with clean water to remove a trace of cleaning products that may impact the sealer. There were a few areas of grout that had cracked and become lose so we set about replacing the grout with a closer match as possible and then left for the day to allow the floor to try overnight.

Sandstone Flagstones Before Sealing Sandstone Flagstones Before Sealing Close-Up

Sealing the Flagstone Floor

We sealed the Sandstone flagstones with a single coat of Tile Doctor Colour Grow, there are a number of sealers we could of used for this floor all have different effects and differing levels of stain protection against spills but Colour Grow is really durable and helps to bring out the deep colour from within the stone . To finish and build up the lustre and richness of the colour we then applied seven coats of Seal & Go which add a nice low sheen to the surface of the tile.

Sandstone Flagstones After Sealing Sandstone Flagstones After Sealing Close-Up


Cleaning and Sealing Sandstone Flags in Stretton under Fosse

Sealing Sandstone Flagstones in Stretton under Fosse Read More »

Slate Floor Restored Final

Restoring a Kitchen Slate floor in Royal Leamington Spa

This Slate tiled kitchen floor at a house in Royal Leamington Spa needed a full clean and seal plus some of the tiles were reclaimed having been used originally outside and as well as loosing colour were suffering from salt damage.

Slate Floor Restoration Before

Cleaning Slate Tiled Flooring

To remove the sealer, clean the floor and tackle the salt damage the floor we used a 50/50 mix of Tile Doctor Pro-Clean and Nanotech Ultra-Clean worked into the floor with a buffing machine fitted with a black scrubbing pad. This product combination creates a powerful cleaning solution with Nano sized abrasive cleaning particles that’s ideal for cleaning difficult floors. It’s also very good for cleaning up grout however I find that’s best tackled manually using a stiff brush.

The next step was to remove the salts from the floor, this problem is more commonly known as efflorescence and results in white salt deposits being left on the surface of the tile, the only way to remove it is with an strong acidic cleaner such as Tile Doctor Grout Clean-Up, you do need to be careful not to allow it to dwell too long as it can damage the tile surface.

Last step in the process was to remove the soiled cleaning solution with wet vacuum and then wash down the whole floor with clean water in order to neutralise it before sealing. We have invested in a powerful indoor spinner tool for this purpose which is a fantastic product that applies and removes water under high pressure. We then left the floor so it could dry overnight.

Slate Floor Restoration Cleaned

Sealing and Colouring Slate Tiles

The reclaimed slate tiles were a different colour to the rest and the owner was keen to have them dyed to make the floor uniform, fortunately we access to an industrial stone colouring product and were able to apply this to darken the stone.

Slate Floor Restoration Adding Colour Slate Floor Restoration Adding Colour

The next step was to seal the slate floor and for this we applied a coat of Tile Doctor Colour Grow which seals and deepens the black colour of the Slate, the floor was left to dry fully and then we applied a further three coats of Tile Doctor Seal and Go to bring out more colour and add a low sheen.

Slate Floor Restored Final
 

Cleaning and Sealing Slate Tiled Floor in Royal Leamington Spa

Restoring a Kitchen Slate floor in Royal Leamington Spa Read More »

Victorian Floor After Restoration

Victorian Tiled Floor in Erdington Birmingham

Victorian Floor in Erdington Birmingham

Details below of a Victorian Floor Resotration job in Erdington. The floor was soiled with dirt and paint spots and the owner wanted it restored back to its original beauty and preserved for the future.

Victorian Floor Before Restoration Victorian Floor Before Restoration
Victorian Tiled Floor Before Restoration

Cleaning the Victorian Tiled Floor

We used Pro-Clean mixed 50/50 with NanoTech Ultra Clean and hot water mopped on to the floor and left for 20mins to soak to help release the dirt. This was followed by scrubbing with a heavy floor buffer fitted with a black pad; we used a wet vacuum to pick up the solution from the floor and then rinsed with clean water and then steam vacuumed and speed dried with a fan blower.

Victorian Floor After Restoration
Victorian Tiled Floor After Restoration

Sealing the Victorian Tiled Floor

When dry the floor was sealed with 2 coats of Tile Doctor Colour Grow to bring out colour then one coat of Tile Doctor Seal and Go to add a shine. The jobs took two days in total, the photographs don’t really do the floor justice but the difference was remarkable.

Victorian Floor Restoration in Erdington Birmingham

Victorian Tiled Floor in Erdington Birmingham Read More »

Scroll to Top